
Forum Replies Created
-
AuthorReplies
-
Jim
Thanks for hosting the race last night. I had a great time. Catching up with Joe and Gary was like a mini Maxport reunion . Pizza in the yard was such a pleasant break, a tranquil atmosphere and a terrific venue for race stories and nostalgia. It was a good mix of classes and it inspires me to do a proper fender less Hot Rod of my own.
Cheers
Steve
Hi Guys
I’m planning to attend this Saturday with the Ford GT and the Lola I raced last time around but using numbers 68 and 69. Looking forward to seeing you guys for the first time in 2019.
Cheers
Steve
Congratulations on the new track. It looks great!
Cheers
Steve
Looks great Ken, congratulations!
Merry Christmas to everyone, and may the New Year fulfill all your wishes!
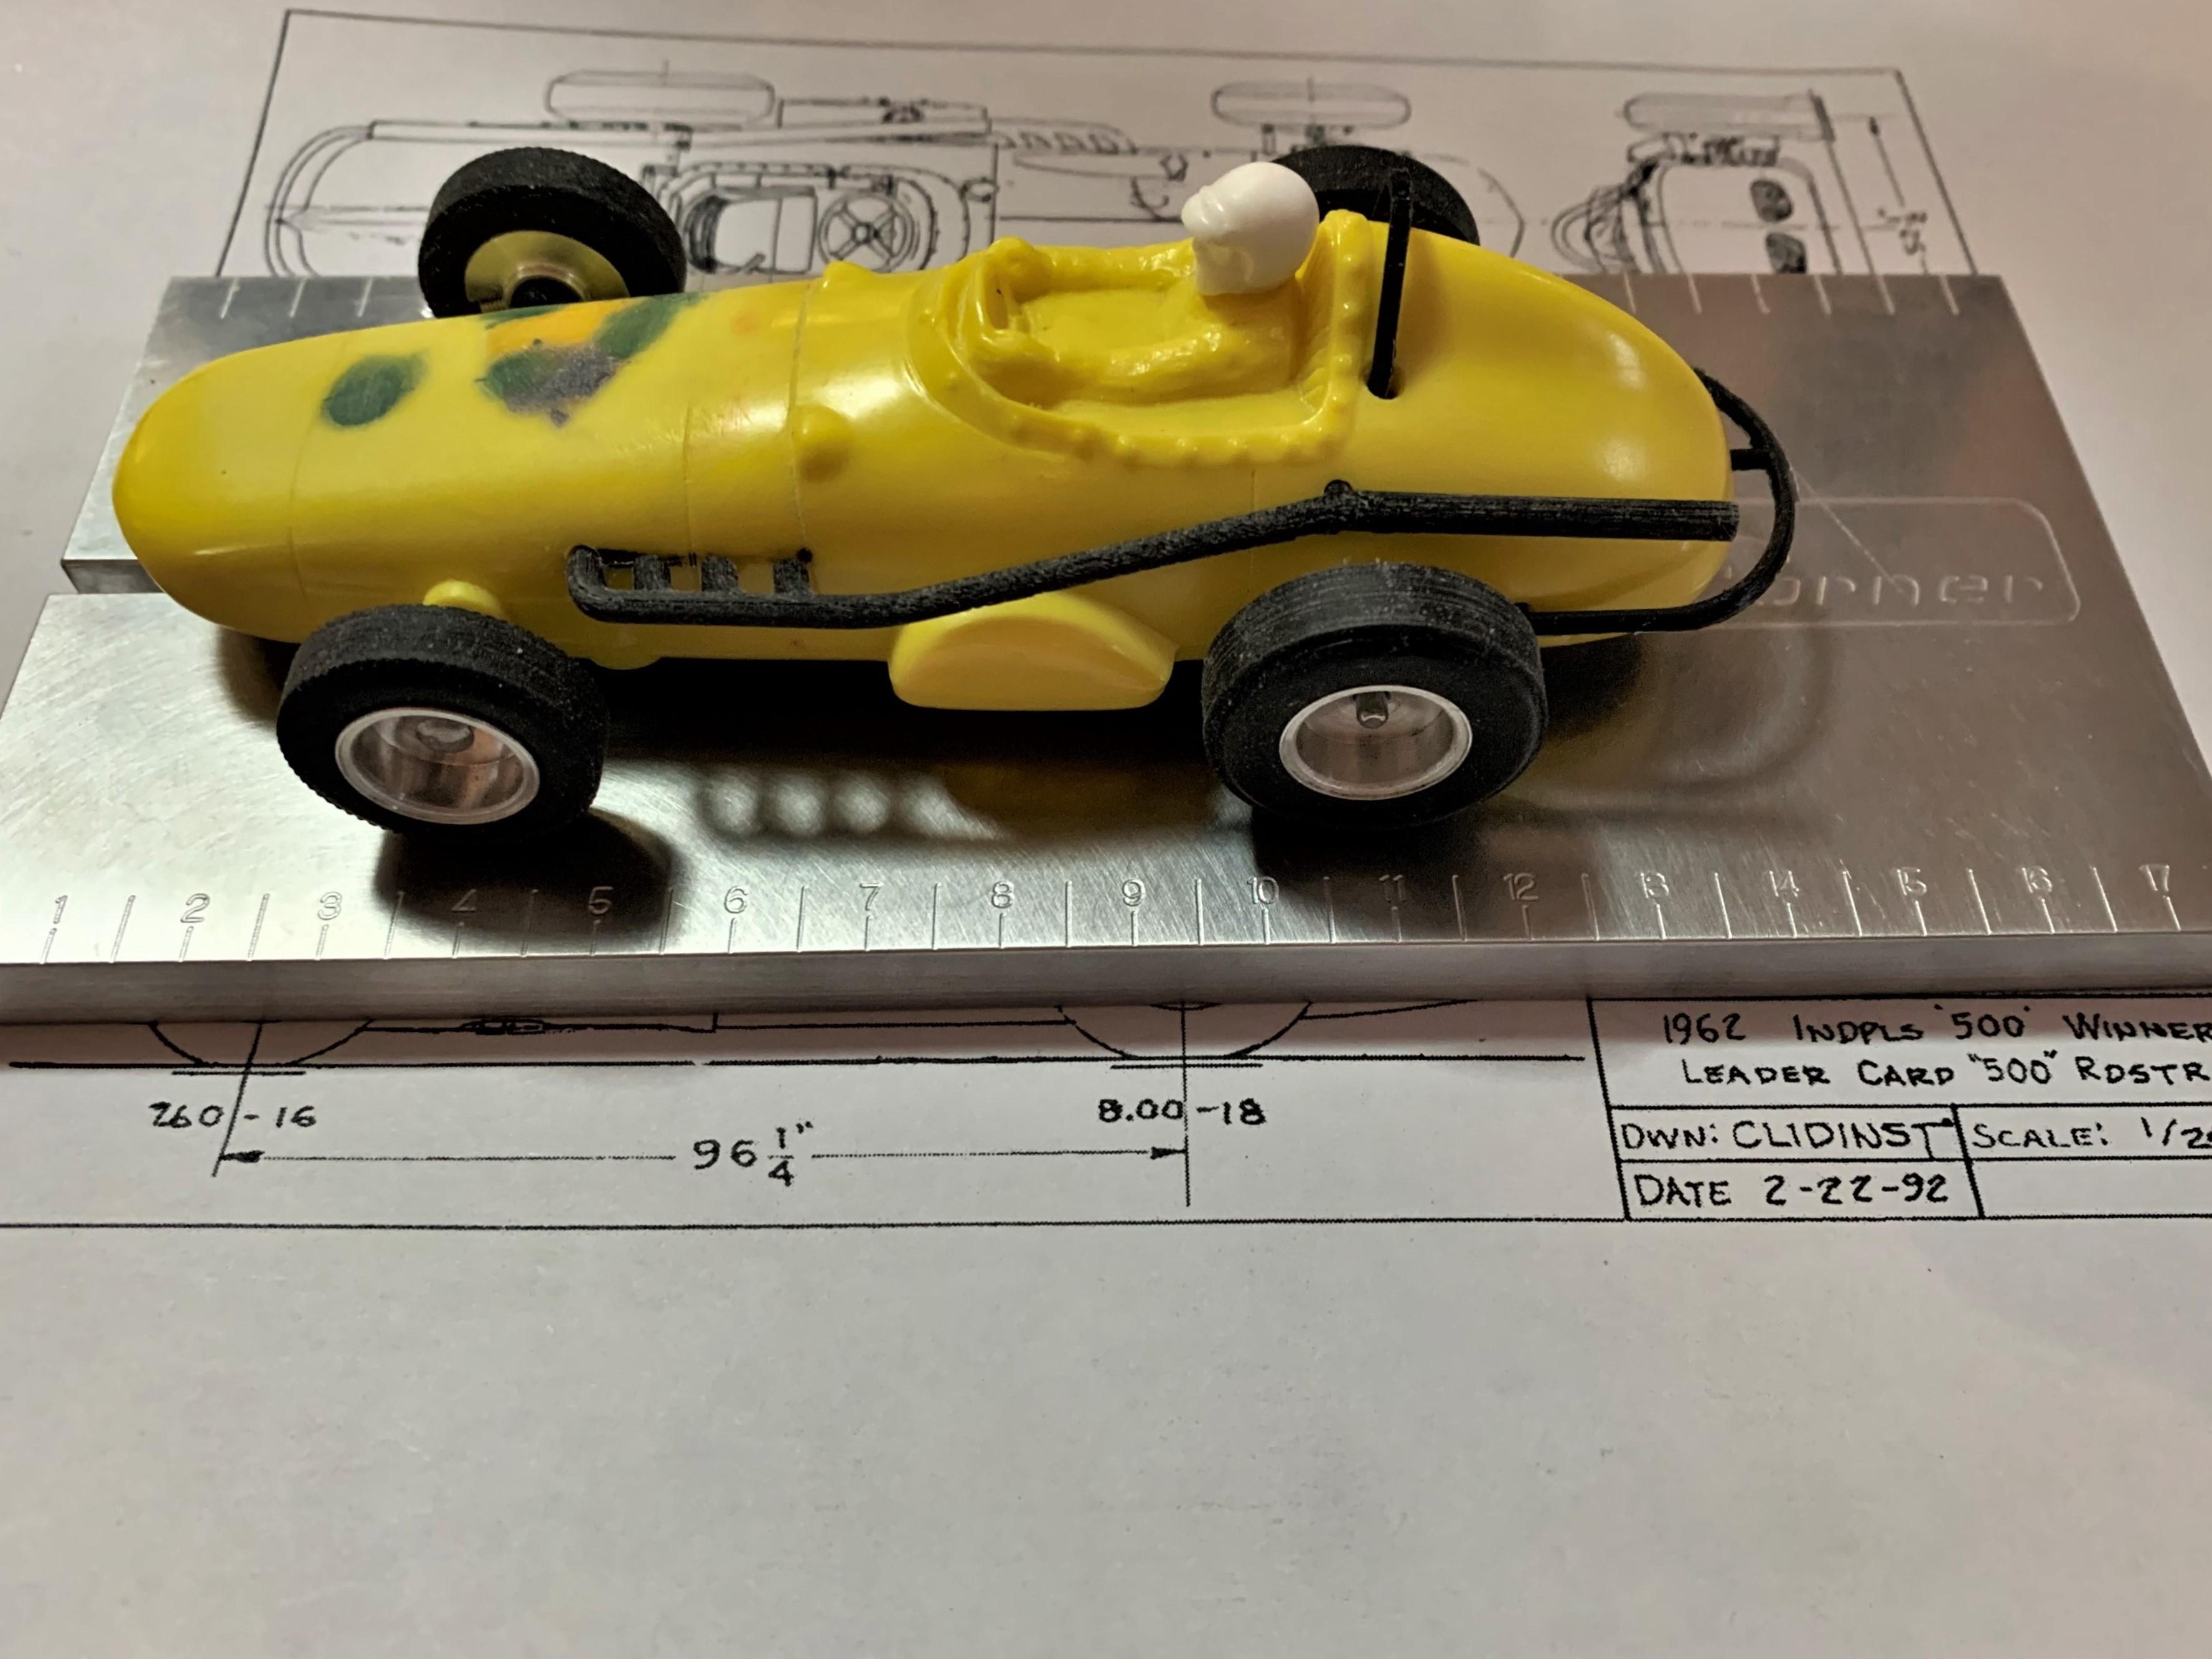
Our next Carrera Panamericana is coming up next week but unfortunately I have a conflict and will not be able to attend. I have however been working on my Lancia D24, making many mistakes but learning a lot. I’ve finally overcome the engineering challenges of fitting a 3D printed chassis in such a small car with a short front overhang. The front axle is independent and uses 2mm grub screws to adjust the ride height. The rear axle has a 1.5 mm offset to lower the C.G. which was the most I could use and still have it run smoothly. I’ve been able to get the ground clearance to just a hair under 2mm and the weight should be under 57 grams with interior, wheel inserts, exhaust, accessories and paint.
The resin body was warped during printing or curing so I had to use a hot water bath to straighten it out. On close inspection of the body the layer lines were visible and there is either a run in the resin or the primer but some diligent sanding should improve these. I’ve designed but not yet printed a basic decal set and I hope to add decal based headlights and tiny gauges.
I’ve included a few photos showing my progress. Doing everything from scratch has shown me how interconnected everything is and how a small mistake or mismeasurement can seriously degrade a cars performance or stop it running at all.
I hope you all have a Happy Easter
Cheers
Steve
Art I just clipped of the supports and took off some printing artifacts. I need to do some grinding to accommodate the mounting posts and the guide then I’ll give it a light swipe with some sandpaper before priming.
Good to hear that you’re back home Ken. I’m sure I speak for all of us at S32 when I wish you a rapid and complete recovery.
Cheers
Steve
Very impressive Luis!
I love the way the tire decals pop. They make the whole thing scream Indy 500. How did you apply them to look so perfect, as if they were pad printed?
That cockpit is beautiful. Did you paint the gauges?
Cheers
Steve
That red white and blue color scheme epitomizes the look and feel of an Indy Roadster. The car looks great. Thanks for the chassis pics DB, they really show off all the engineering and building skills required for this class of racing. I have to try my hand at a brass and wire front motor chassis too. There is so much going on in so little space. I think if I can pull it off it should really help my building skills. After all it looks like I’ll have the time now.
Cheers
Steve
That looks great DB! Do you have any pictures of the chassis that you could share with us?
Cheers
Steve
That’s one fancy piece of engineering Art. Clever solution for mounting the motor to allow both a front motor layout and a torsion chassis. By the way what are you using to couple the motor shaft to the drive shaft?
Cheers
Steve
Chris
That chassis is a thing of beauty. I need to figure out how to translate those design and construction principles to a front motor lay out.
Cheers
Steve
Hi Chris
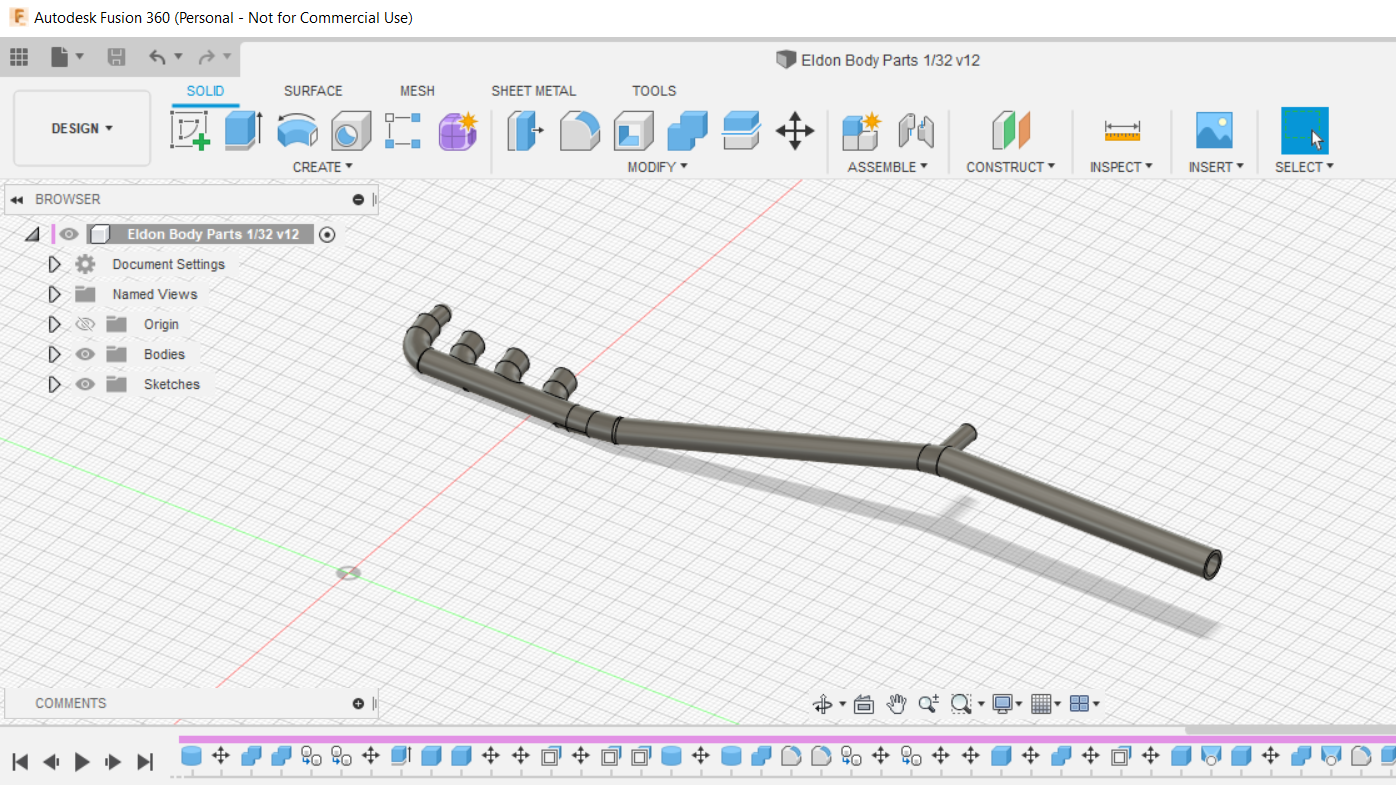
That’s one great looking roadster. I’m trying to work on my 3D printing and design skills so I’ve been concentrating on trying to design the parts in Fusion 360 and produce the parts on my Tronxy printer. I’ve learned that wire, metal, epoxy and solder can give me both a quicker and better result for small parts and I do still intend to use them on my models but I got back into slot cars mostly because of nostalgia and on this particular project I was trying hard to preserve some of it’s essential “Eldonness”, the parts being just slightly out of scale and made of plastic help to maintain that feel for me.
I’d love to see the chassis you built for your roadster. I’ve used a printed chassis for this model but I feel that brass and wire chassis or the aluminum ones that Ken makes still have a performance advantage because of their greater tunability and precision.
Cheers
Steve
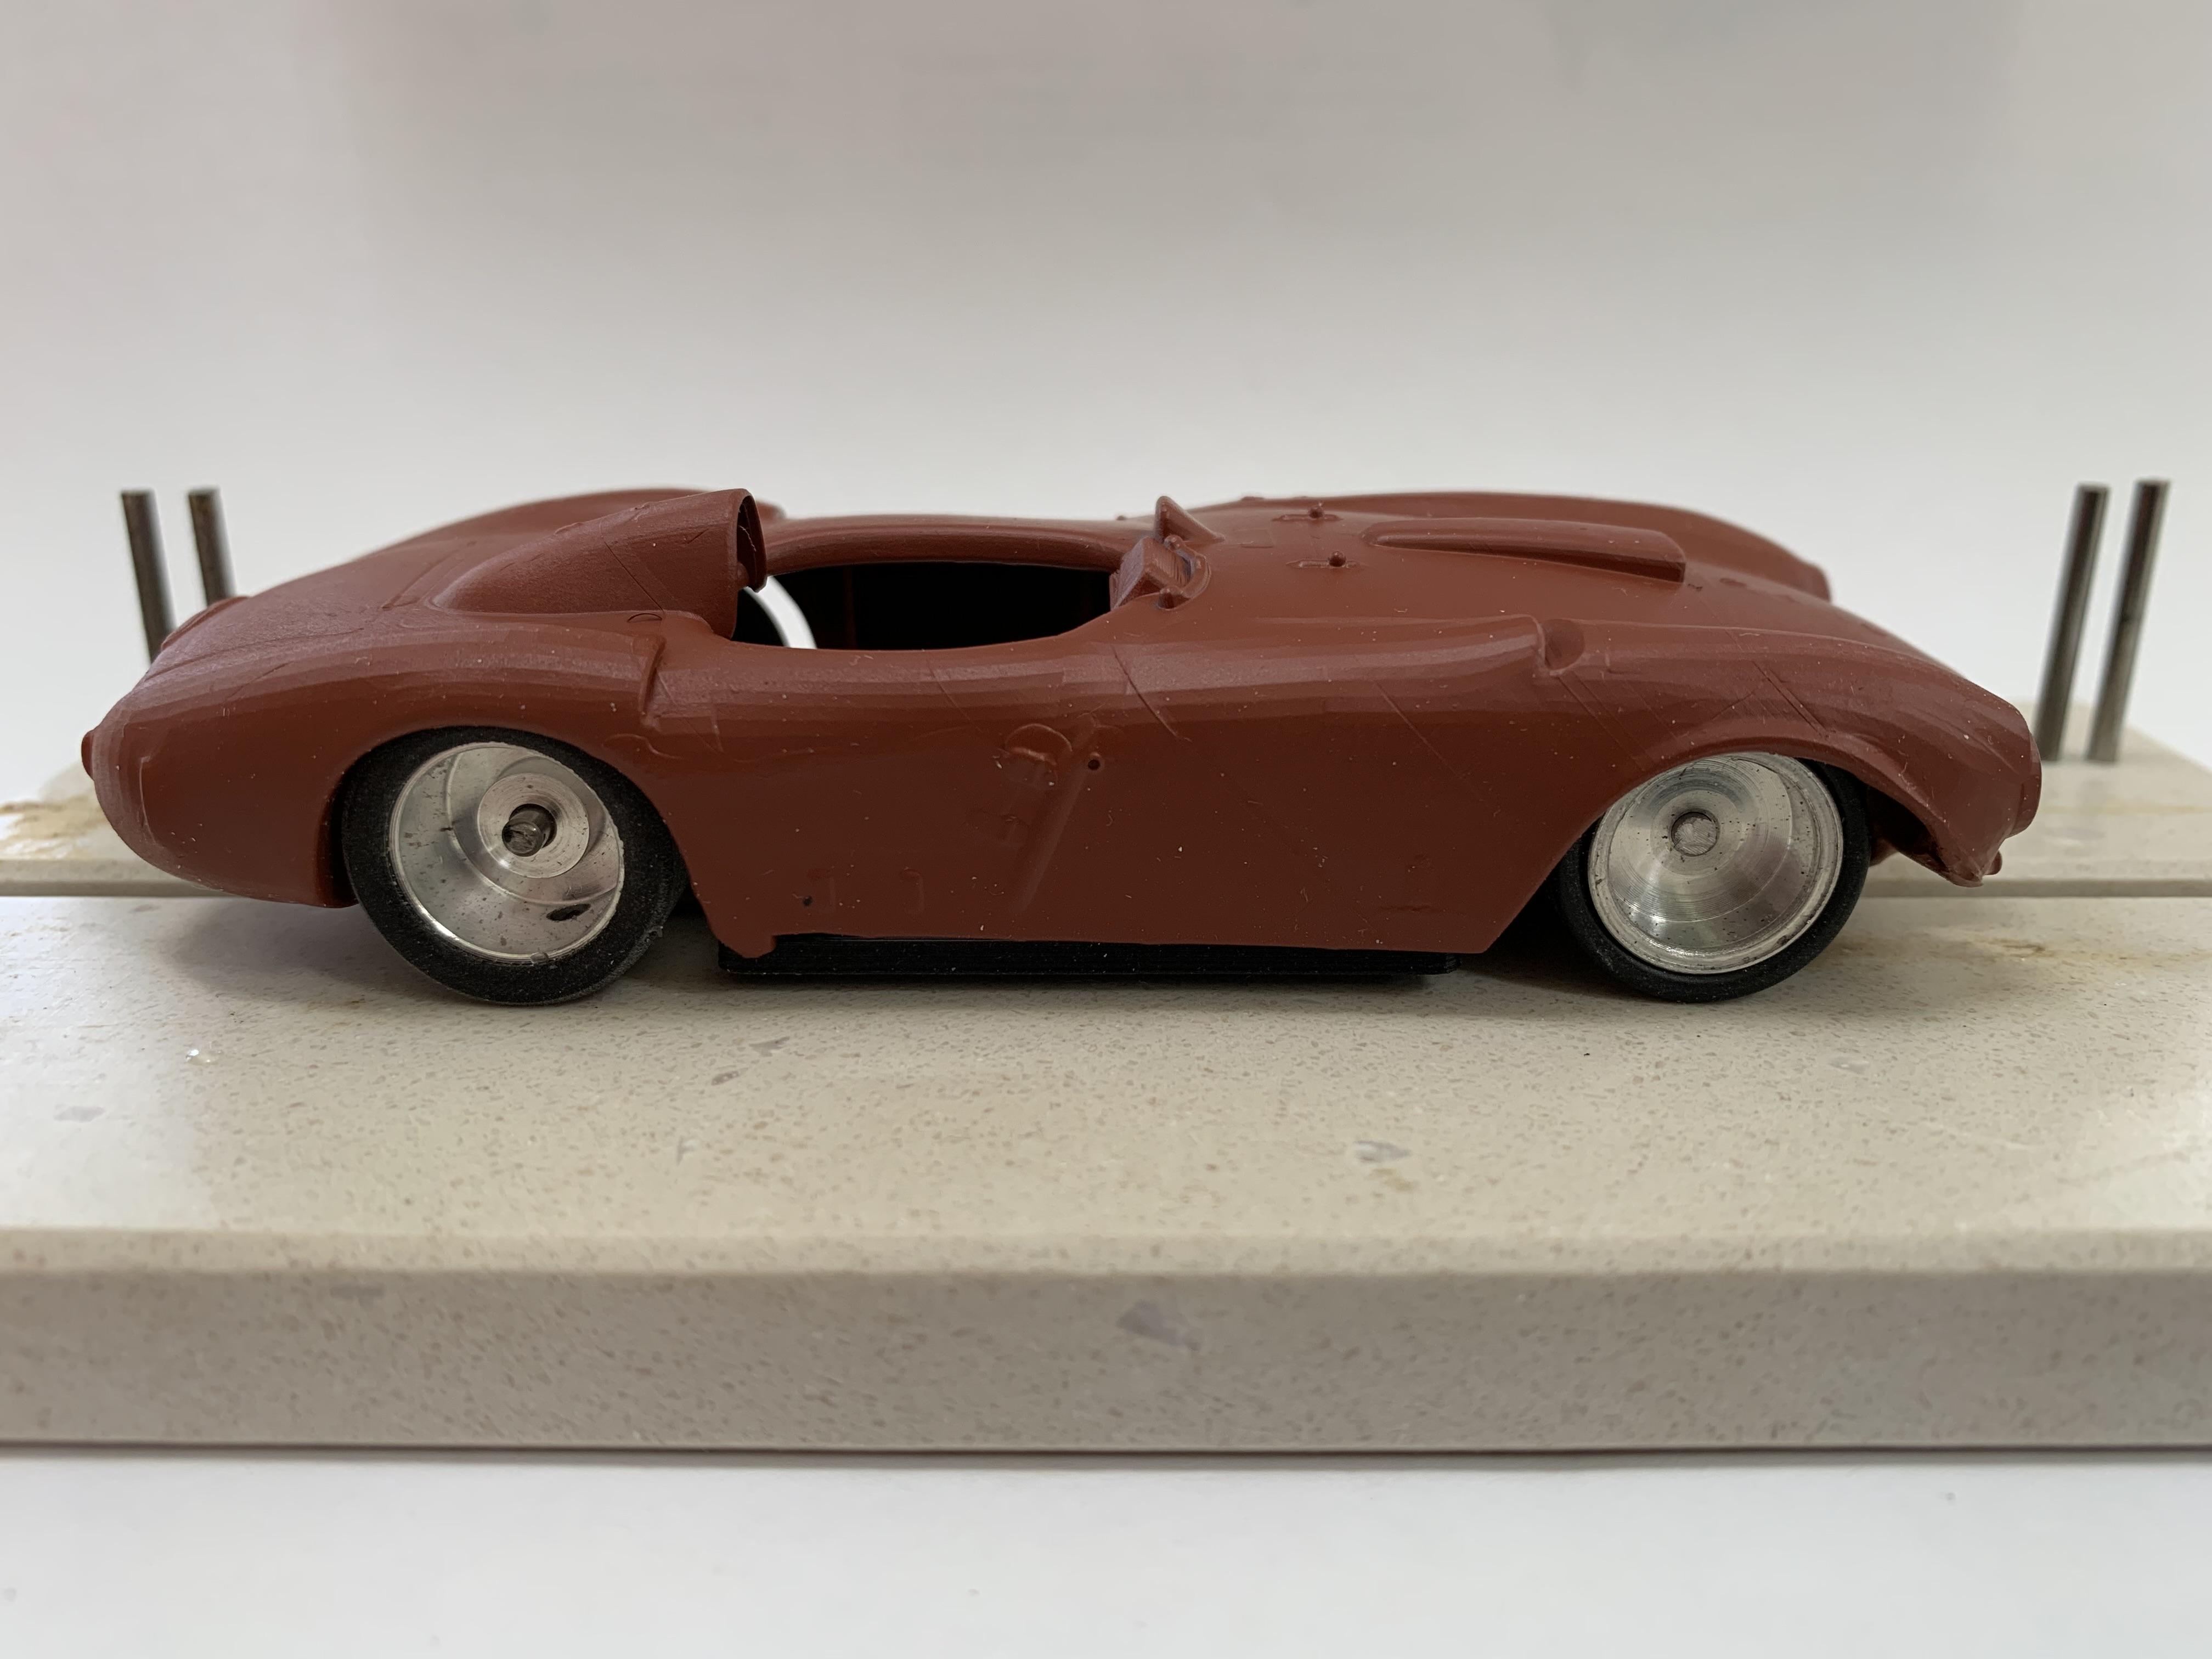
Here’s some of the work that I’ve done on the body of my roadster. It has a provisional exhaust, nerf bar and roll bar. I’m trying to figure out the proper fuel filler, steering arm, wheel inserts, lower front fascia and most challenging for me a windshield that will look right on this car. All the parts were designed in Fusion 360 and printed on my Tronxy 3D printer.
Cheers
Steve
July 9, 2021 at 2:34 pm in reply to: July 5, 2021 (10am – 2pm) Rule Twerks & Open Track Practice #18878Ken
I was just trying to specify an easily policed overall maximum width but I have no problem with a maximum 60mm track as long as there is also a concrete maximum overall width. Thinking just of my builds, let’s call that 63mm overall.
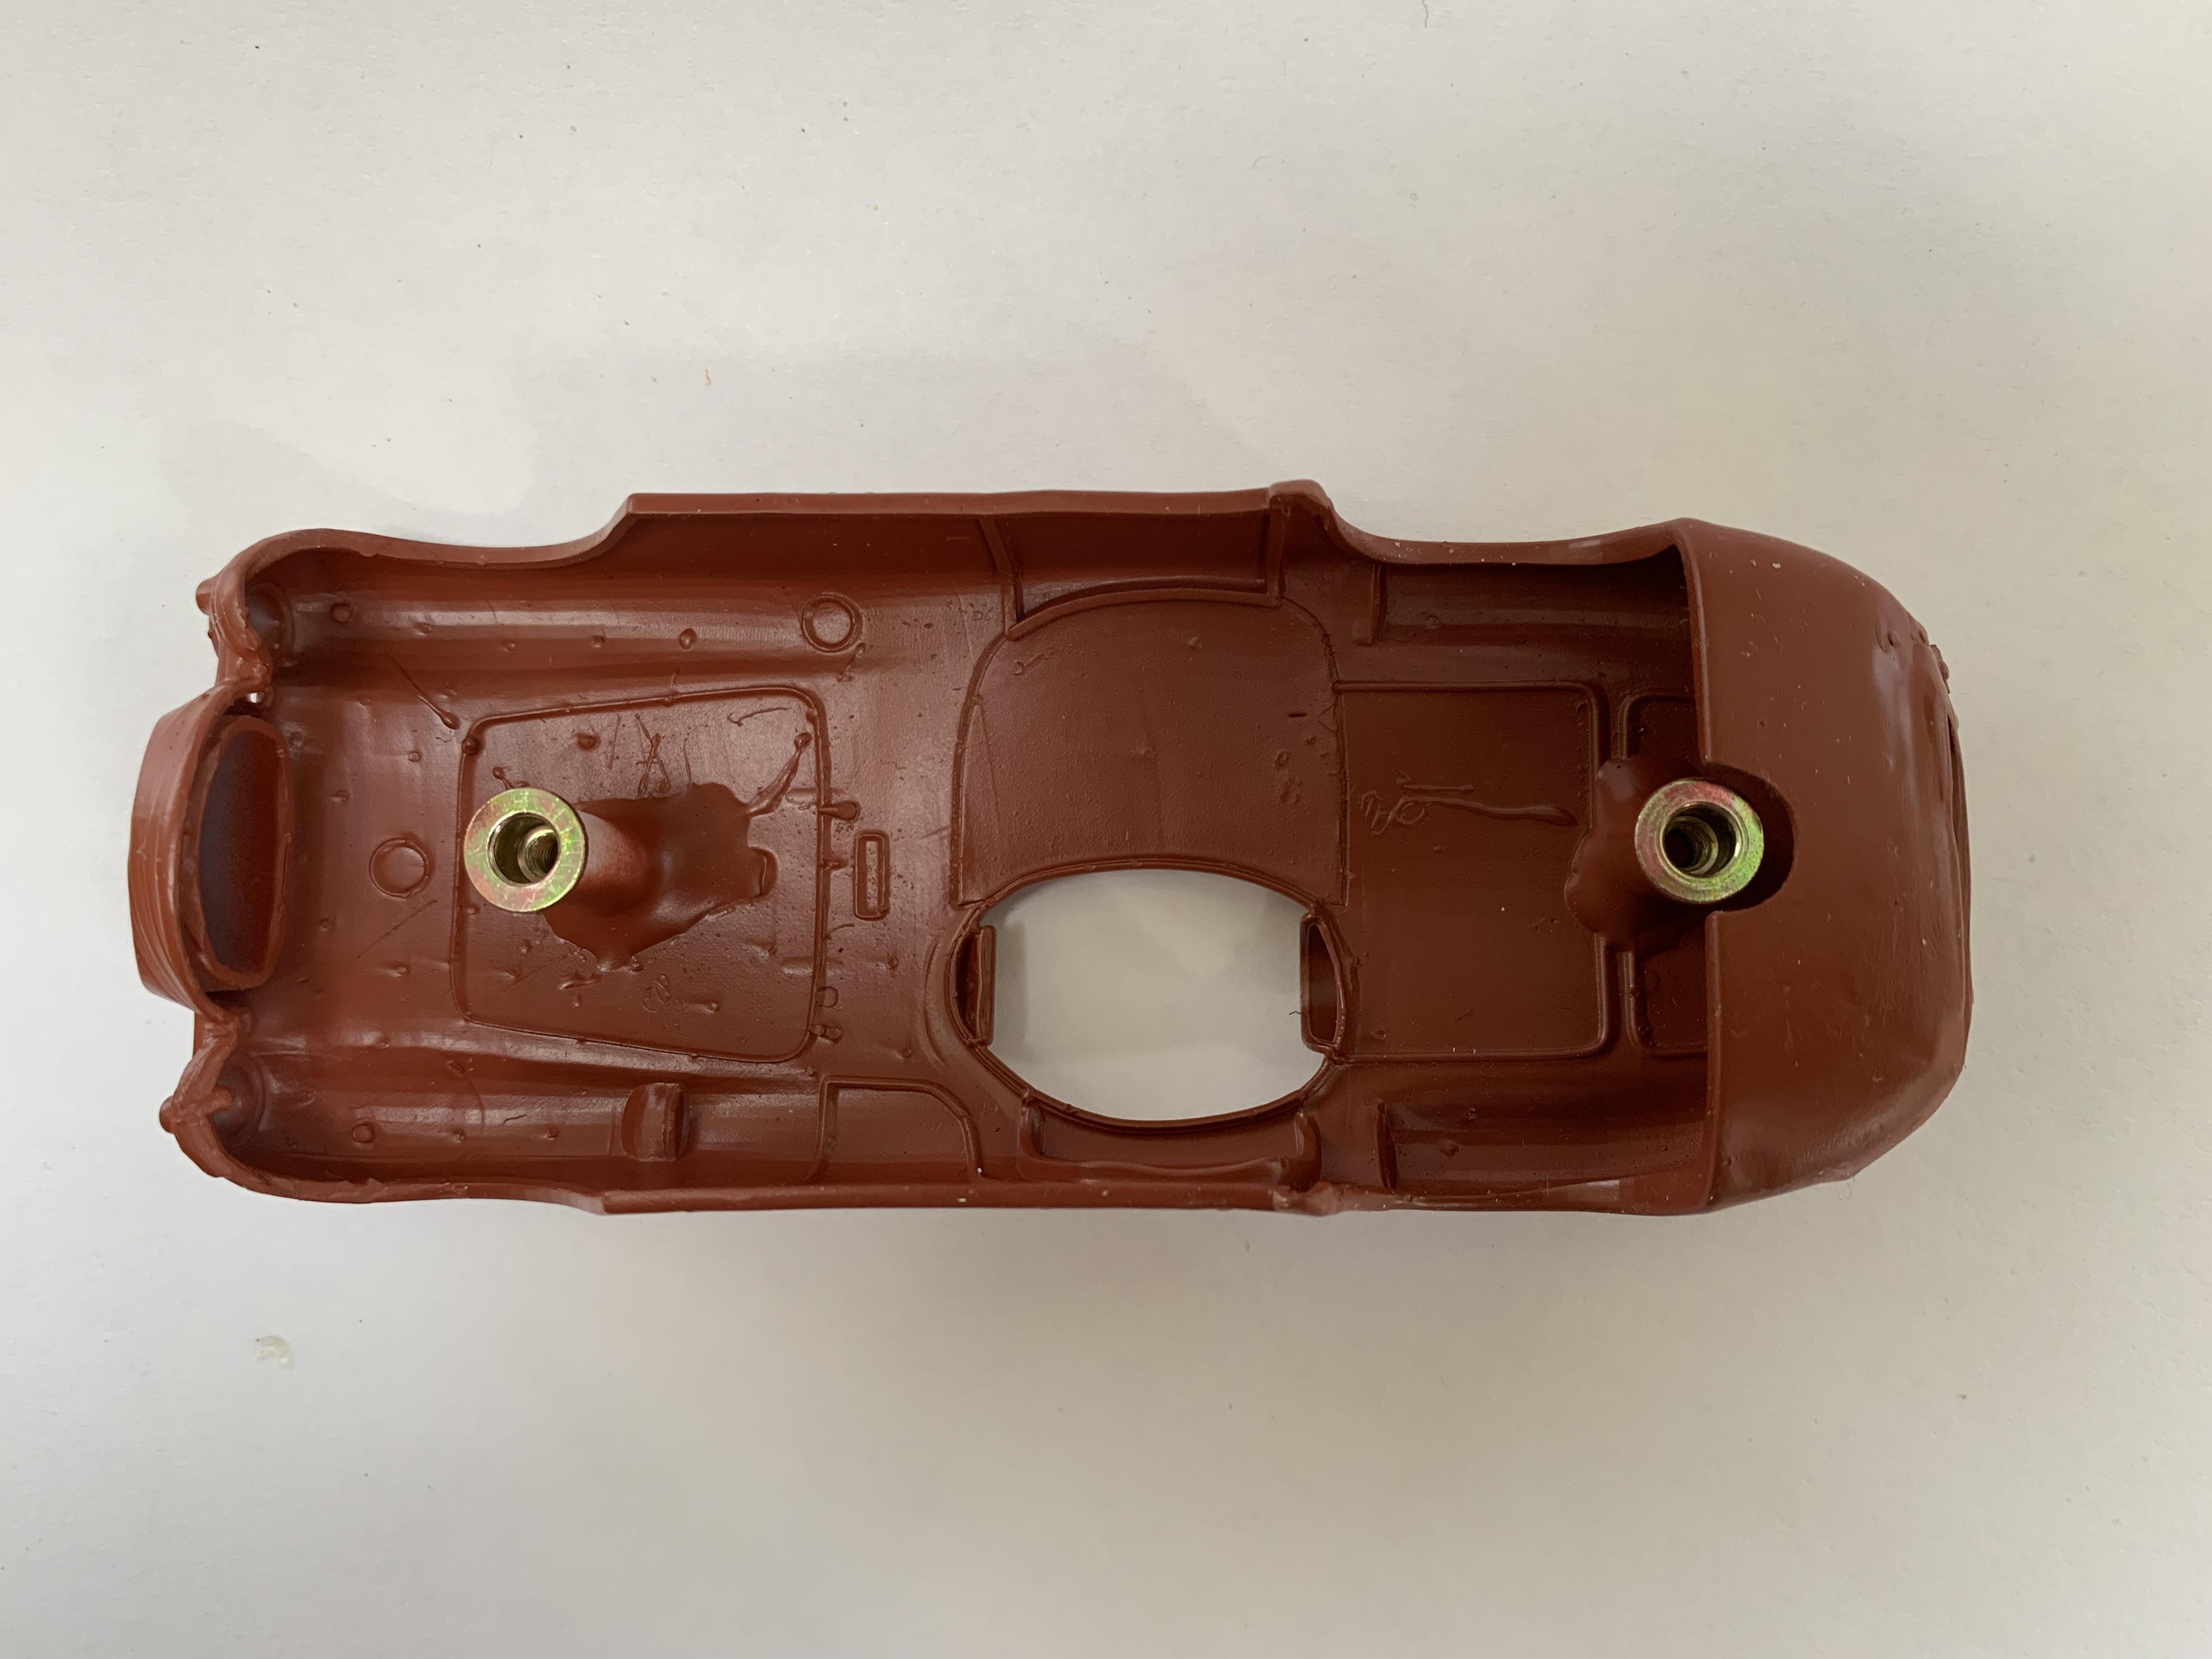
I’m not enthusiastic about three basically identical cars for testing as that takes away from the creativity that I’m trying to encourage. I would be open to designing and printing a 3D chassis for Felix or anyone else who’s interested whether it be sidewinder, anglewinder or inline in order to speed up the testing process. I would need the desired track, wheelbase and overall length and width. If you already have a car in mind a photo copy of the bottom of the car would also be helpful.
Ken you and I both live in Scarborough, I’m not sure where Felix lives. Vicky and I have a large back yard and we have started hosting small groups outside. I’m willing to host up to four people and might even throw in a hot dog if it would help move the discussion.
Cheers
Steve
July 9, 2021 at 9:37 am in reply to: July 5, 2021 (10am – 2pm) Rule Twerks & Open Track Practice #18874Good Morning Everyone
Firstly thank you Art for committing to hosting any HR+ events once we have come to some consensus as to what HR+ should be. Without the commitment of track owners this would be an exercise in futility as Felix, Ken and I don’t currently have our own tracks. I certainly have my own ideas on how to move forward and I’d like to share some of them here.
Being mindful of some of the potential difficulties of wide track open wheel slot cars on tracks with 3″ spacing here’s what I’ve come up with so far.
1. The limited torque of the slow FF050 motor means that all builders would have to make the trade off between wider tires and track and better performance, therefore I suggest this be the spec motor for this class, allowing much greater choice in chassis design (inline, sidewinder, anglewinder ) while keeping the HR cars competitive with the HR+ cars. This will allow greater creativity by those who wish to build new cars while insuring existing cars would be run with them thereby allowing fuller fields and minimizing category creep.
2. I’ve taken my calipers to the bodies I’d hoped to use as Hot Rods and the widest is my ’41 Willy’s Coupe at 62.5mm which is positively gigantic next to my 53mm ’32 Ford. So in order to allow for the full range of Hot Rods I suggest a maximum width of 65mm, no ifs ands or buts the widest part of the car whether fenders or wheel assemblies be 65mm. I fully expect most cars will not be this wide as there is no competitive advantage and most would be esthetically compromised being this wide but I think it’s important not to over regulate as it does stifle creativity.
3. Felix and Ken, I’ll gladly exchange ideas with you on how we might develop cars for this class. I will commit to building a car but I’m probably the slowest builder in the club, having said that my next project after the two Indy Roadsters I’m working on will be a Hot Rod. The three of us however aren’t the only ones that this class is for so I encourage all interested club members to consider a build.
This is not a Steve, Felix and Ken issue it is a club and rules issue so we should try to frame it that way. The lively discussion we’ve been having is the sort of thing that keeps clubs living and breathing.
4. I doubt that these changes are likely to cause significantly greater problems racing as everyone will have had to make their own car and are therefore not likely to be reckless with their handiwork. Any problems I’ve had racing have been due to lack of familiarity and skill not recklessness. I don’t like it when even my R32 cars get scuffed up or lose pieces.
5. We’ve had some great looking and innovative Hot Rods brought by former members to compete that did not fit the HR rules but did not cause significant problems while racing. I’m not sure I’ve got the name right but Larry’s cars come to mind.
So much for my interim thoughts, let’s talk’
Cheers
Steve
July 6, 2021 at 9:22 am in reply to: July 5, 2021 (10am – 2pm) Rule Twerks & Open Track Practice #18857Good Morning all
It’s great to see such a spirited exchange on this forum. There are so many interesting and valid points, even if they can be contradictory.
Art I like the way you’ve outlined the two basic classes of rules, by looking at it this way we can make changes that benefit all the club members without being inordinately bound by dogma. I agree that Class 2 rules need more consideration. Many of us may never be front runners but still don’t want anyone but ourselves impeding our progress.
It seems to me that the only obstacle to widening the track for the Hot Rod class is the space they might take up on the narrower tracks that we race on. That’s fair enough. How about this as a possible compromise. The overall width of any Hot Rod at it’s widest point, either the outside of the body/fender unit or the widest part of the tire, which ever is greater may not exceed 60mm. This is the width allowed for our 3LGP class which I believe can run successfully on any of our host tracks and well below the maximum width of some of the classes we already run. If we continue to mandate the slow motor, which I think we should, we could allow both inline and sidewinder/anglewinder options which would allow greater diversity of builds and maybe a few more exposed engines( if you can find them). Hot rods have always been about speed but the culture that grew out of them was purely about style. Let’s allow more style into the HotRod class. The really competitive racers will most likely gravitate towards the fastest set up but by opening up the rules this way we can allow everyone to express themselves in the way they best see fit just like the full size automotive scene.
Cheers
Steve
July 5, 2021 at 11:31 am in reply to: July 5, 2021 (10am – 2pm) Rule Twerks & Open Track Practice #18849Not only would I not want any currently eligible models to be excluded but I would love a greater diversity of Hot Rod styles to be eligible. I think that is in the spirit of the original and the evolving Hot rod Ethos.
Cheers
Steve
July 5, 2021 at 8:05 am in reply to: July 5, 2021 (10am – 2pm) Rule Twerks & Open Track Practice #18847Good Morning Everyone
Felix It’s good to see your detailed and thoughtful feedback on the rules especially around the Hot Rod class/classes.
I would suggest for the sake of parsimony that the Hot Rod/ Rat Rod classes be combined and that light trucks such as Art’s Mandarin Monsoon be allowed in the Hot Rod class. I think that having an HR and HR+ class is workable as long as the two get to race together even if classified and scored apart. This should allow for both better build diversity and fuller racing fields.
Cheers
Steve
July 1, 2021 at 2:41 pm in reply to: July 5, 2021 (10am – 2pm) Rule Twerks & Open Track Practice #18743I’m sorry I won’t be able to attend this session. I do have a couple of suggestions though. I think it would be great if we had the ability to use wide wheels and tires for the “Hot Rod” class so that we could emulate the types of cars that can be seen in movies such as “American Graffiti” or at the shows like the various “Good Guys” shows in The States, which are the biggest displays of Hot Rods on the planet. I’d also suggest we put off any changes or adjustments to the Indy Roadster class until after the we’ve gotten together for the seminar on “Building a Front Motor Indy Roadster” as the realities of building such a car might suggest some tweaking of the expected formula.
Anyway I hope you all have a blast.
Cheers
Steve
I have so many broken cars, with so many broken pieces. Now Felix, I’m trying not to get upset, but are you telling me that they may have died in vain. Thanks for the step by step breakdown. It’s so much easier when you can follow someone’s example.
Cheers
Steve
April 29, 2021 at 12:12 pm in reply to: New User Accounts & Editing New Forum Topics and Replies… #18521Thanks Art
I’ve deleted a couple of my redundant posts but left one that I still feel works to summarize the recent progress on the roadster chassis. It’s great to see more activity on the board lately. I think it helps to keep up our interest until we can race again. I’m sure everyone appreciates your efforts to keep the board going and operating smoothly, I know I do. I will try to post whenever I have anything that might interest our group. New content is the lifeblood of websites.
Cheers
Steve
Hi guys
I thought I’d give a quick update on my Roadster chassis. I scavenged some parts from existing cars so that I could start some testing. Very quickly I found that the shaft bearing would need some additional support as snapping it in had allowed it to occasionally pop out at speed and I didn’t want to glue it in until the entire car was finished and ready to race. So I designed a little screw in brace. The 3D printer really has trouble printing tiny parts and holes but after a couple of iterations I came up with this :

It’s strong enough to accept the small Professor Motor body screws I had on hand and keep the bearing in place, while still being removable for any drive train changes.
Cheers
Steve
I added the bracket as the shaft bearing was popping out at speed, the snap fit I had designed was enable to restrain the torque of such a mighty motor!
All better now, things are starting to slowly pull together.
Cheers
Steve
Bracket for shaft bearing

Cheers
Steve
April 28, 2021 at 2:59 pm in reply to: New User Accounts & Editing New Forum Topics and Replies… #18503Hi Art
I’m having some of the same types of issues as Felix. I made a post to an existing topic yesterday morning(which may have gone over the size limit because of inadvertently choosing the wrong image) and it has not yet shown up but some of my posts often take a day or more to be visible and some I’ve had to redo several times despite seeming to fit all the specified parameters.
Cheers
Steve
Thanks guys
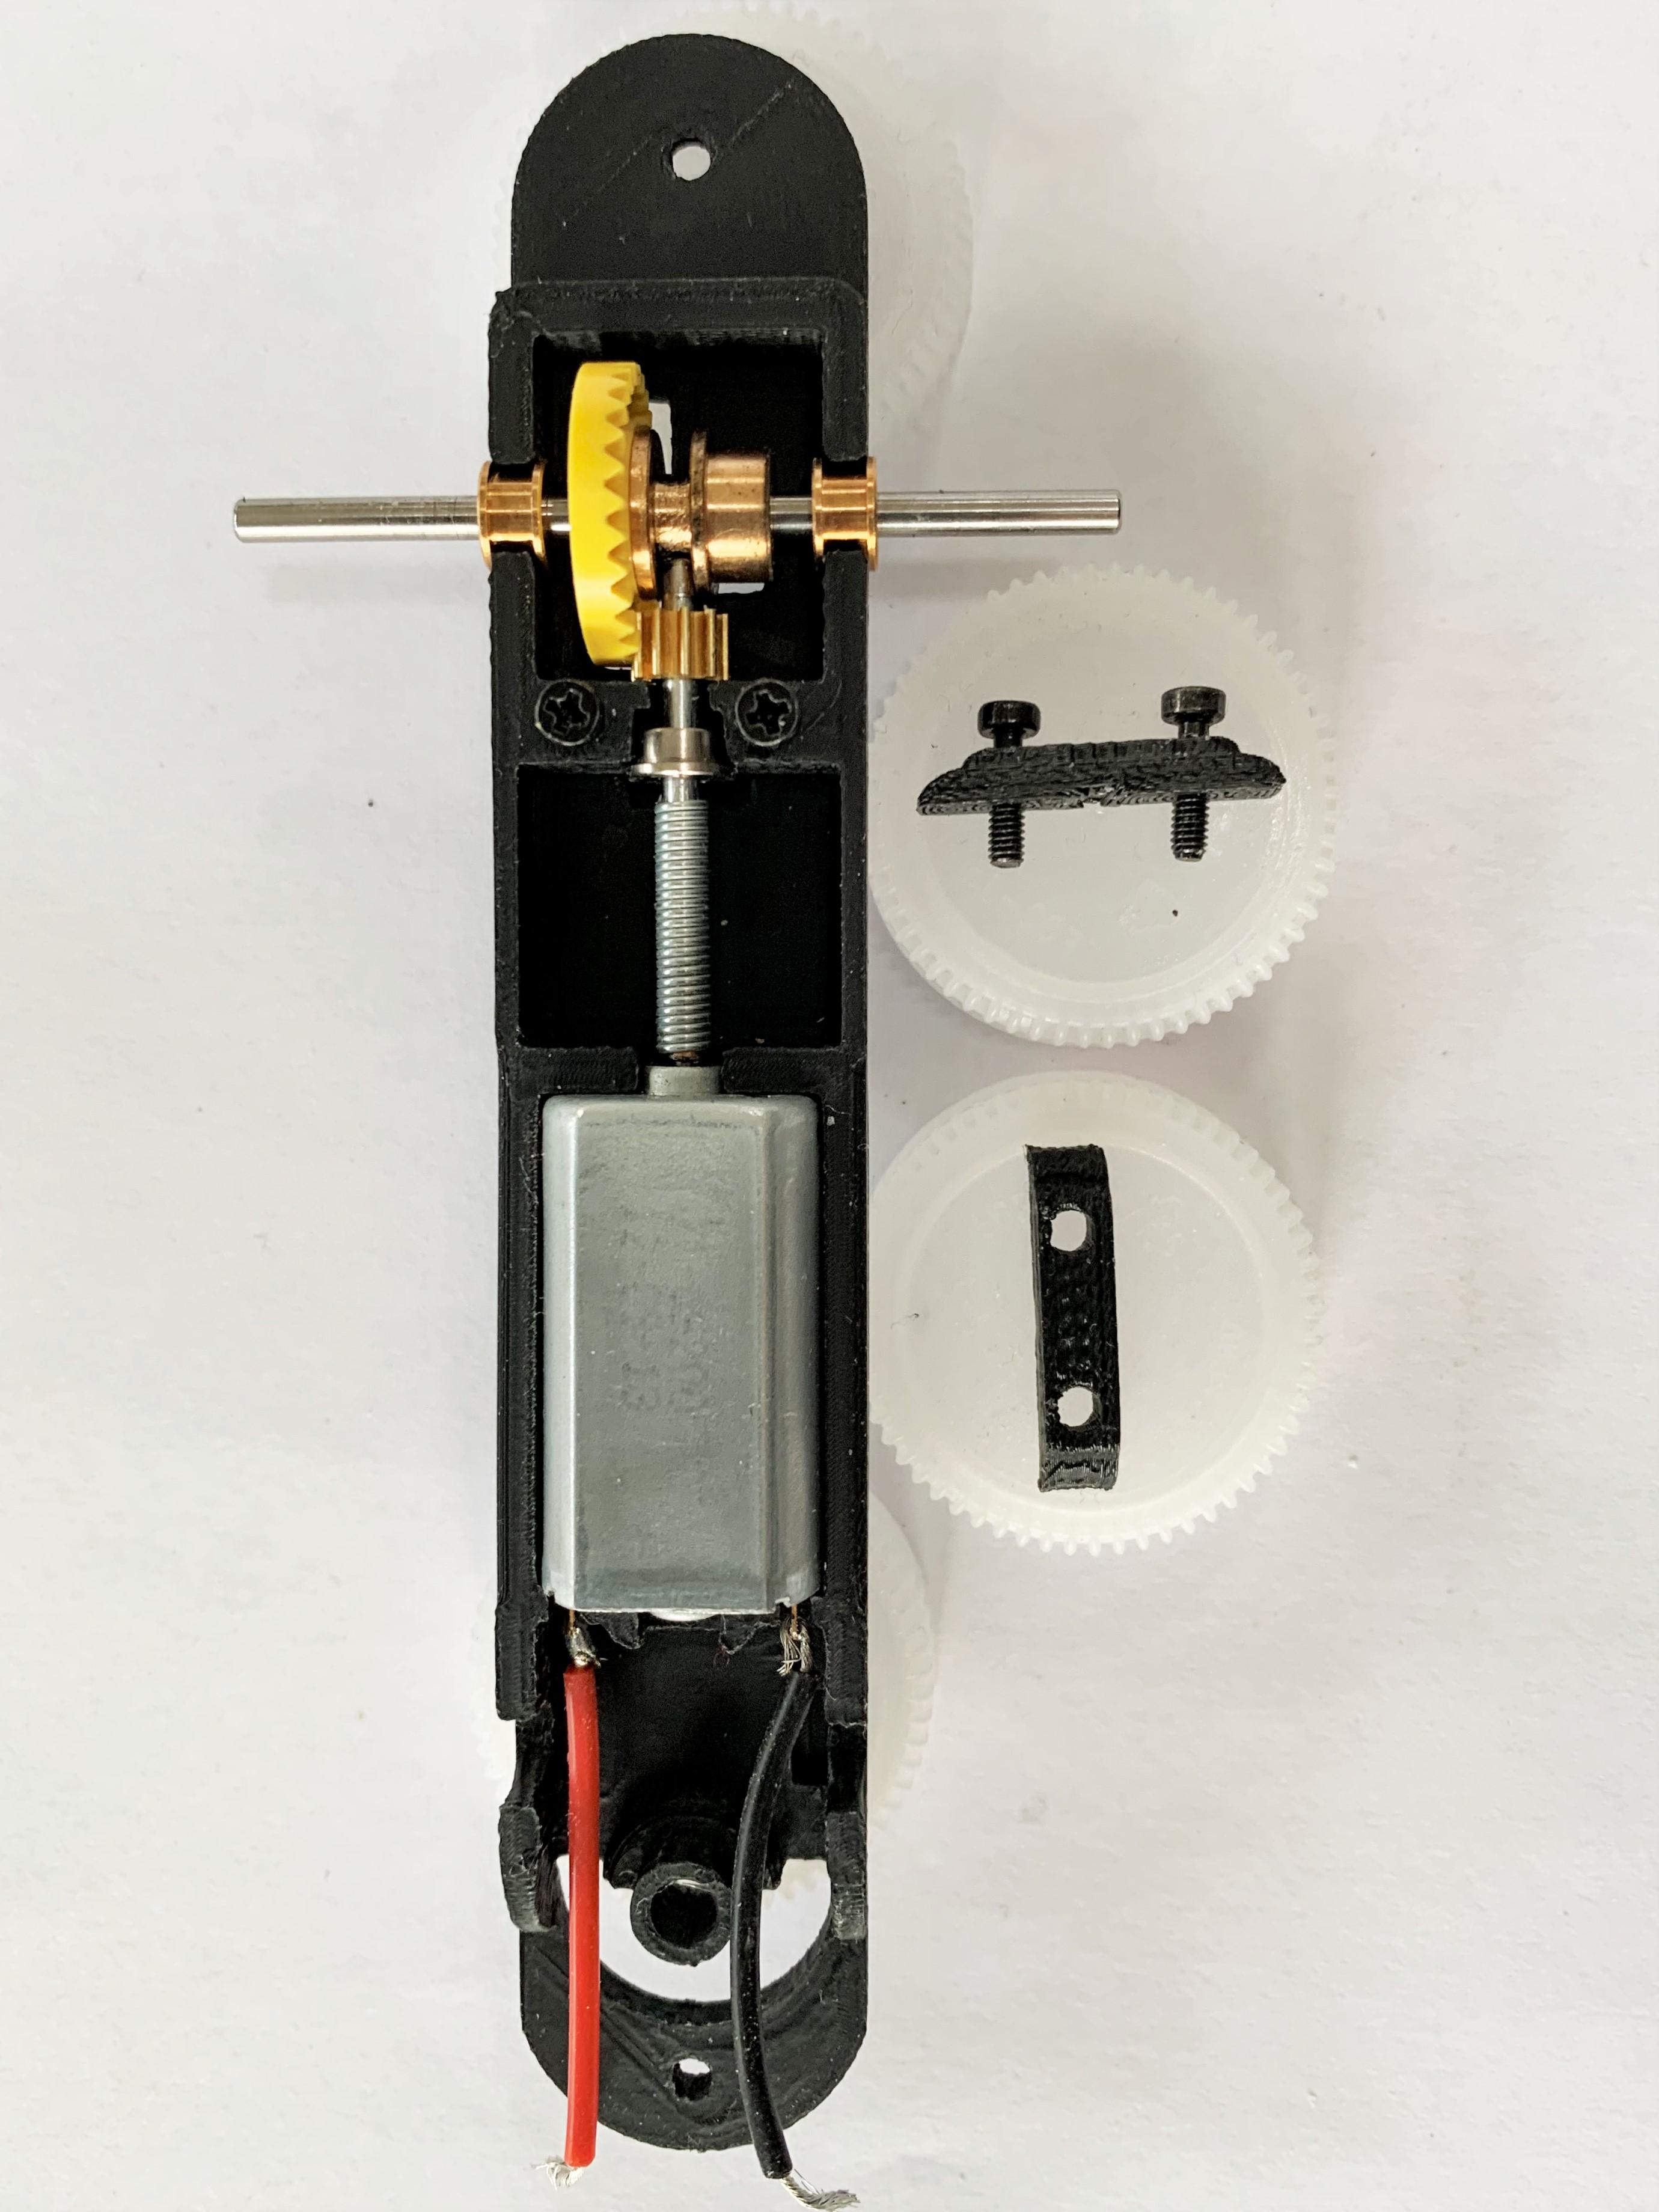
At some point I think I’ll try to get a list of the wheelbases and overall chassis lengths of the bodies that people would like to use so that I can modify and archive the appropriate print files for each body. I’ll need to finish my testing of the final chassis first. There are also some hard limitations on what can be designed. The chassis at this point is exactly 20 mm wide at its widest point and can not be made any narrower without rotating the motor 90 degrees. The position of the motor in the chassis can not readily be set back without running afoul of it’s front engined intent, as it is already at the base of the windshield on my Eldon Watson Roadster, though other cars may have a little more leeway. The wheelbase which is currently 66.9 mm can be lengthened readily but using a spring coupler for the shaft means there are some real packaging constraints and the current space of about 18 mm between the motor and the support for the rear axle and gears is the only place to shorten the wheelbase. With careful fabrication the most the wheelbase could be shortened would be about 10 mm. If you wanted to use body posts for mounting the body the front post would have to be ahead of the guide and the rear post behind the crown gear. These limitations are not unique to this 3D printed chassis but are based on the provisional rules, scale and packaging constraints. There are many alternate ways to mount a body but they would have to be accounted for in the chassis design. I still have a lot to learn about 3D printing and design but I think it is another tool that can make our Hobby more rewarding.
Cheers
Steve
Good Morning Racers!
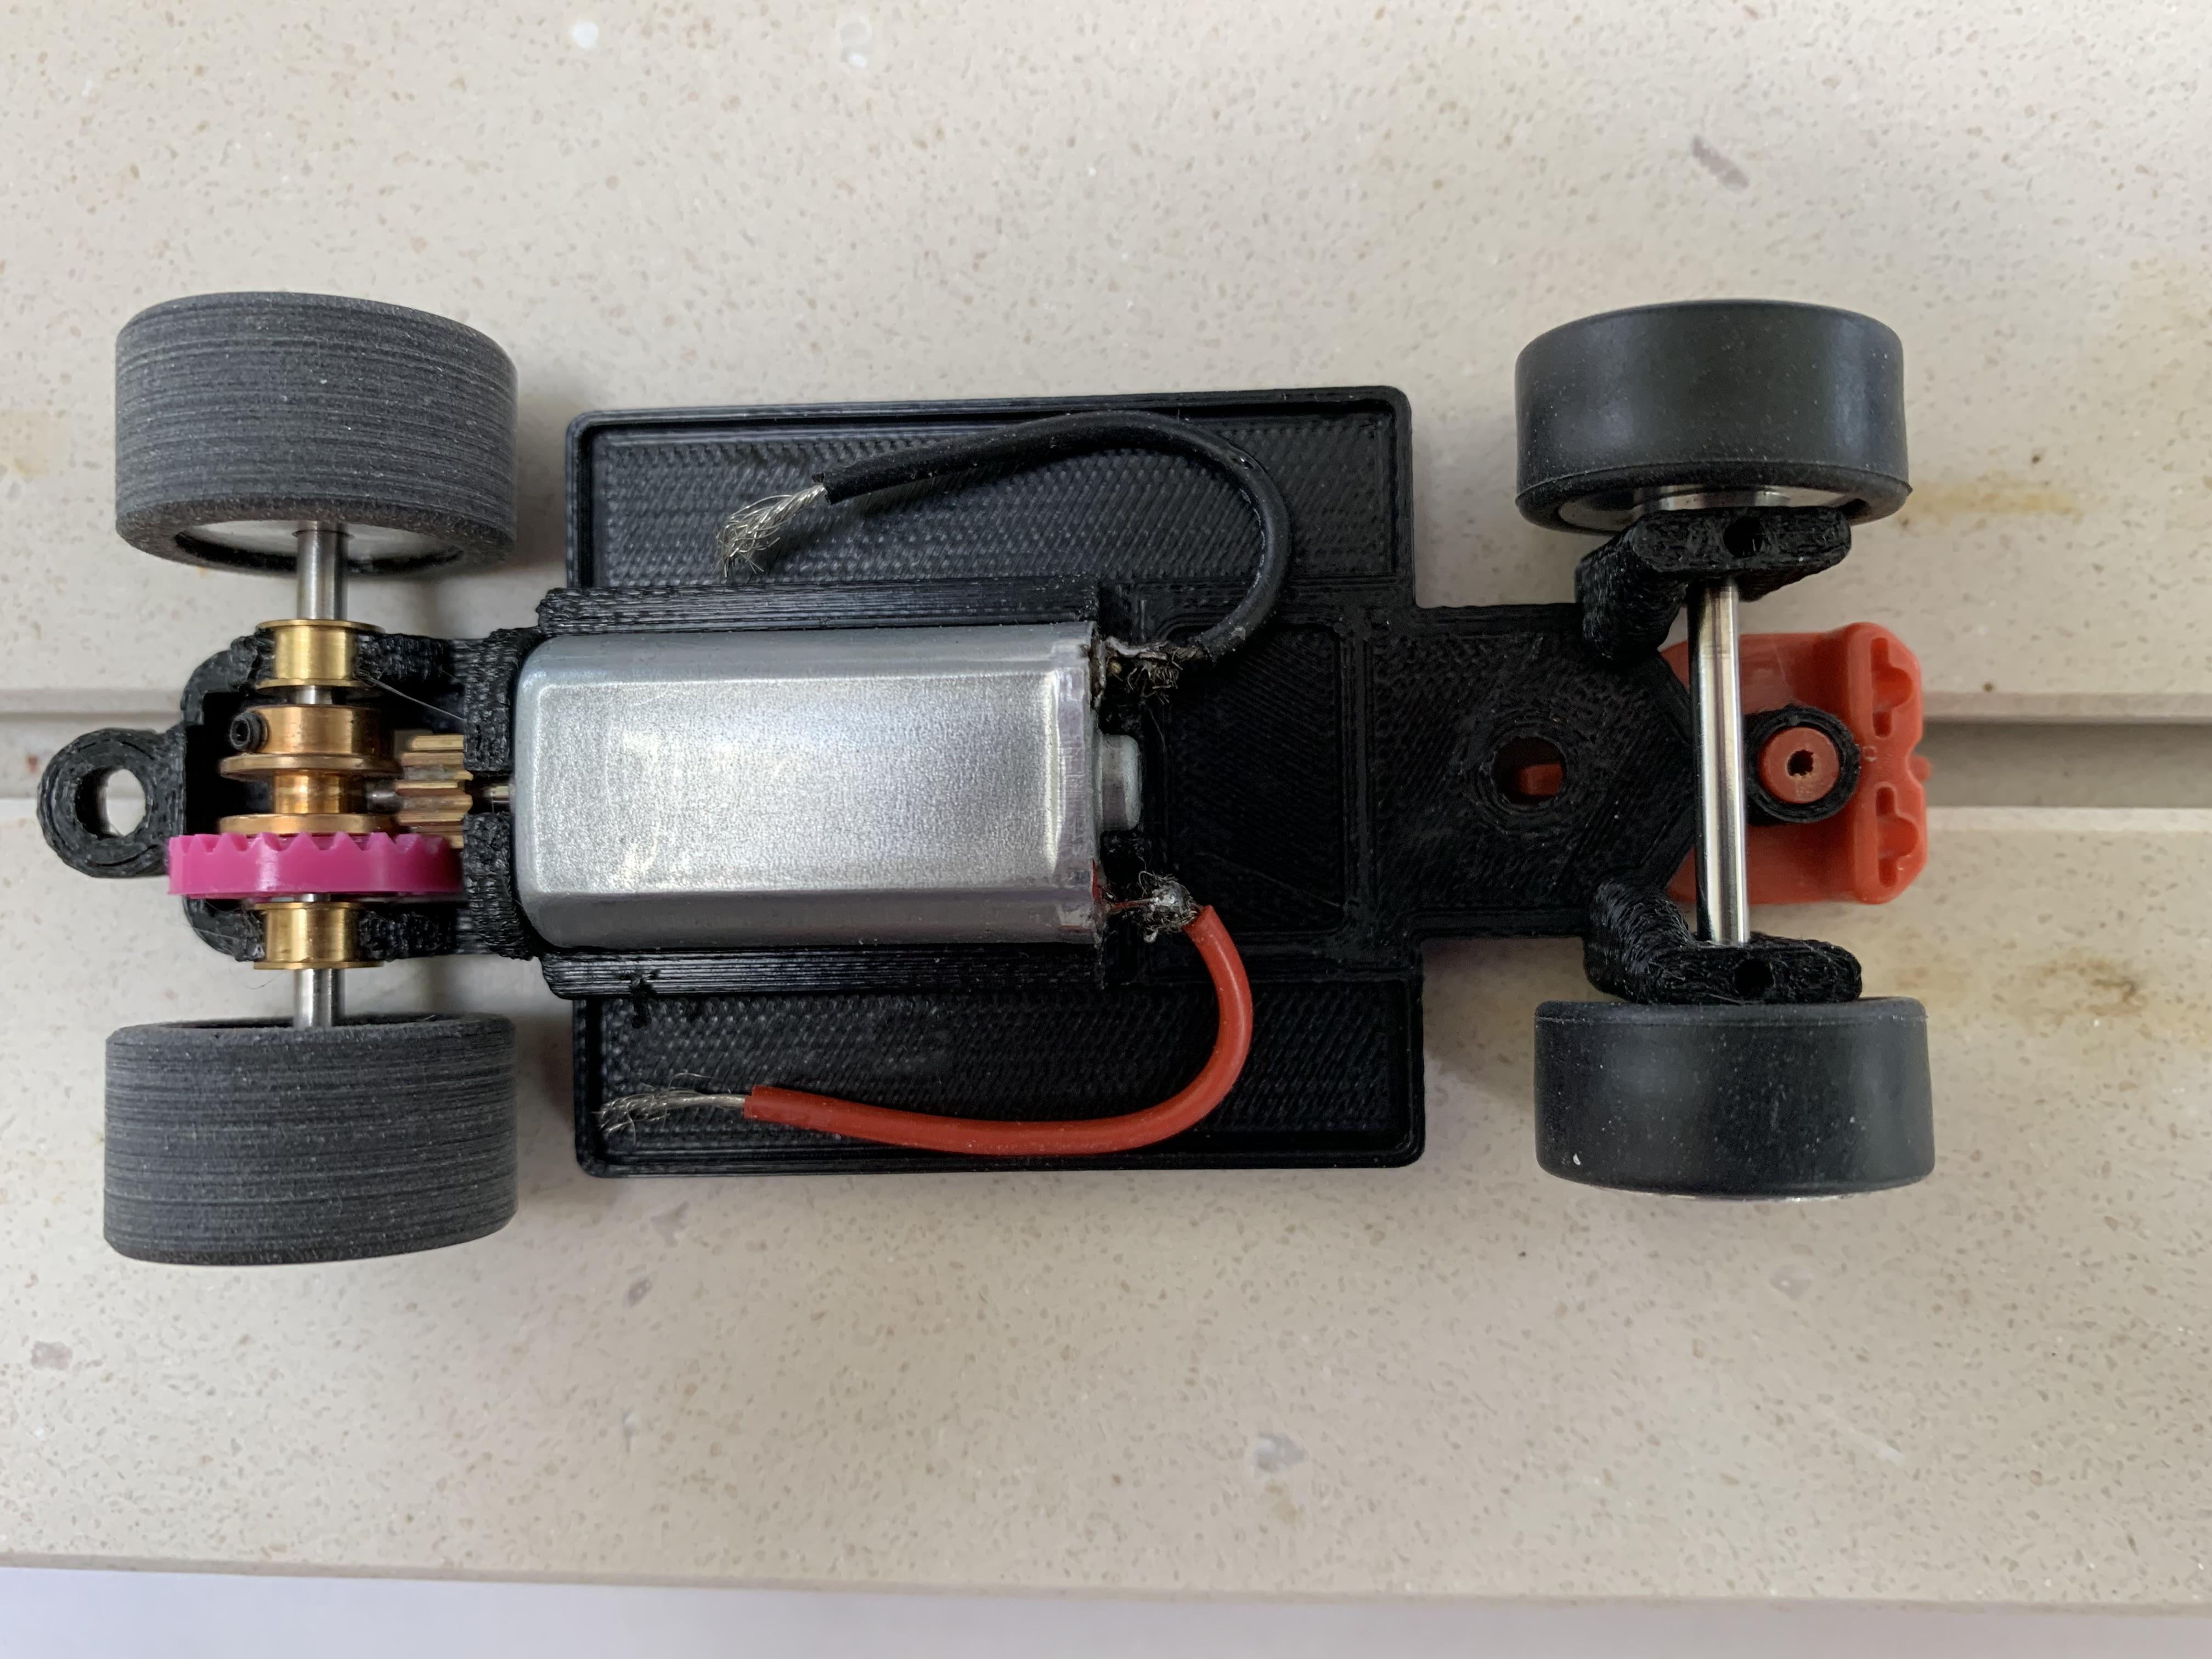
I thought I’d share an update on how the 3D printed chassis project was going. Unfortunately the adjustable chassis idea was just not workable as in order to have enough strength it meant that it would be too wide for some of the roadster bodies eligible for this class. Luckily, as my fusion 360 design skills slowly improved I found that parametric modelling allowed me to easily change the wheelbase in software for each individual car. My wife, who has been very supportive of my various hobby obsessions even bought me a full size 3D printer ( a Tronxy XY-3 Pro ) so that I could print a chassis in one piece.
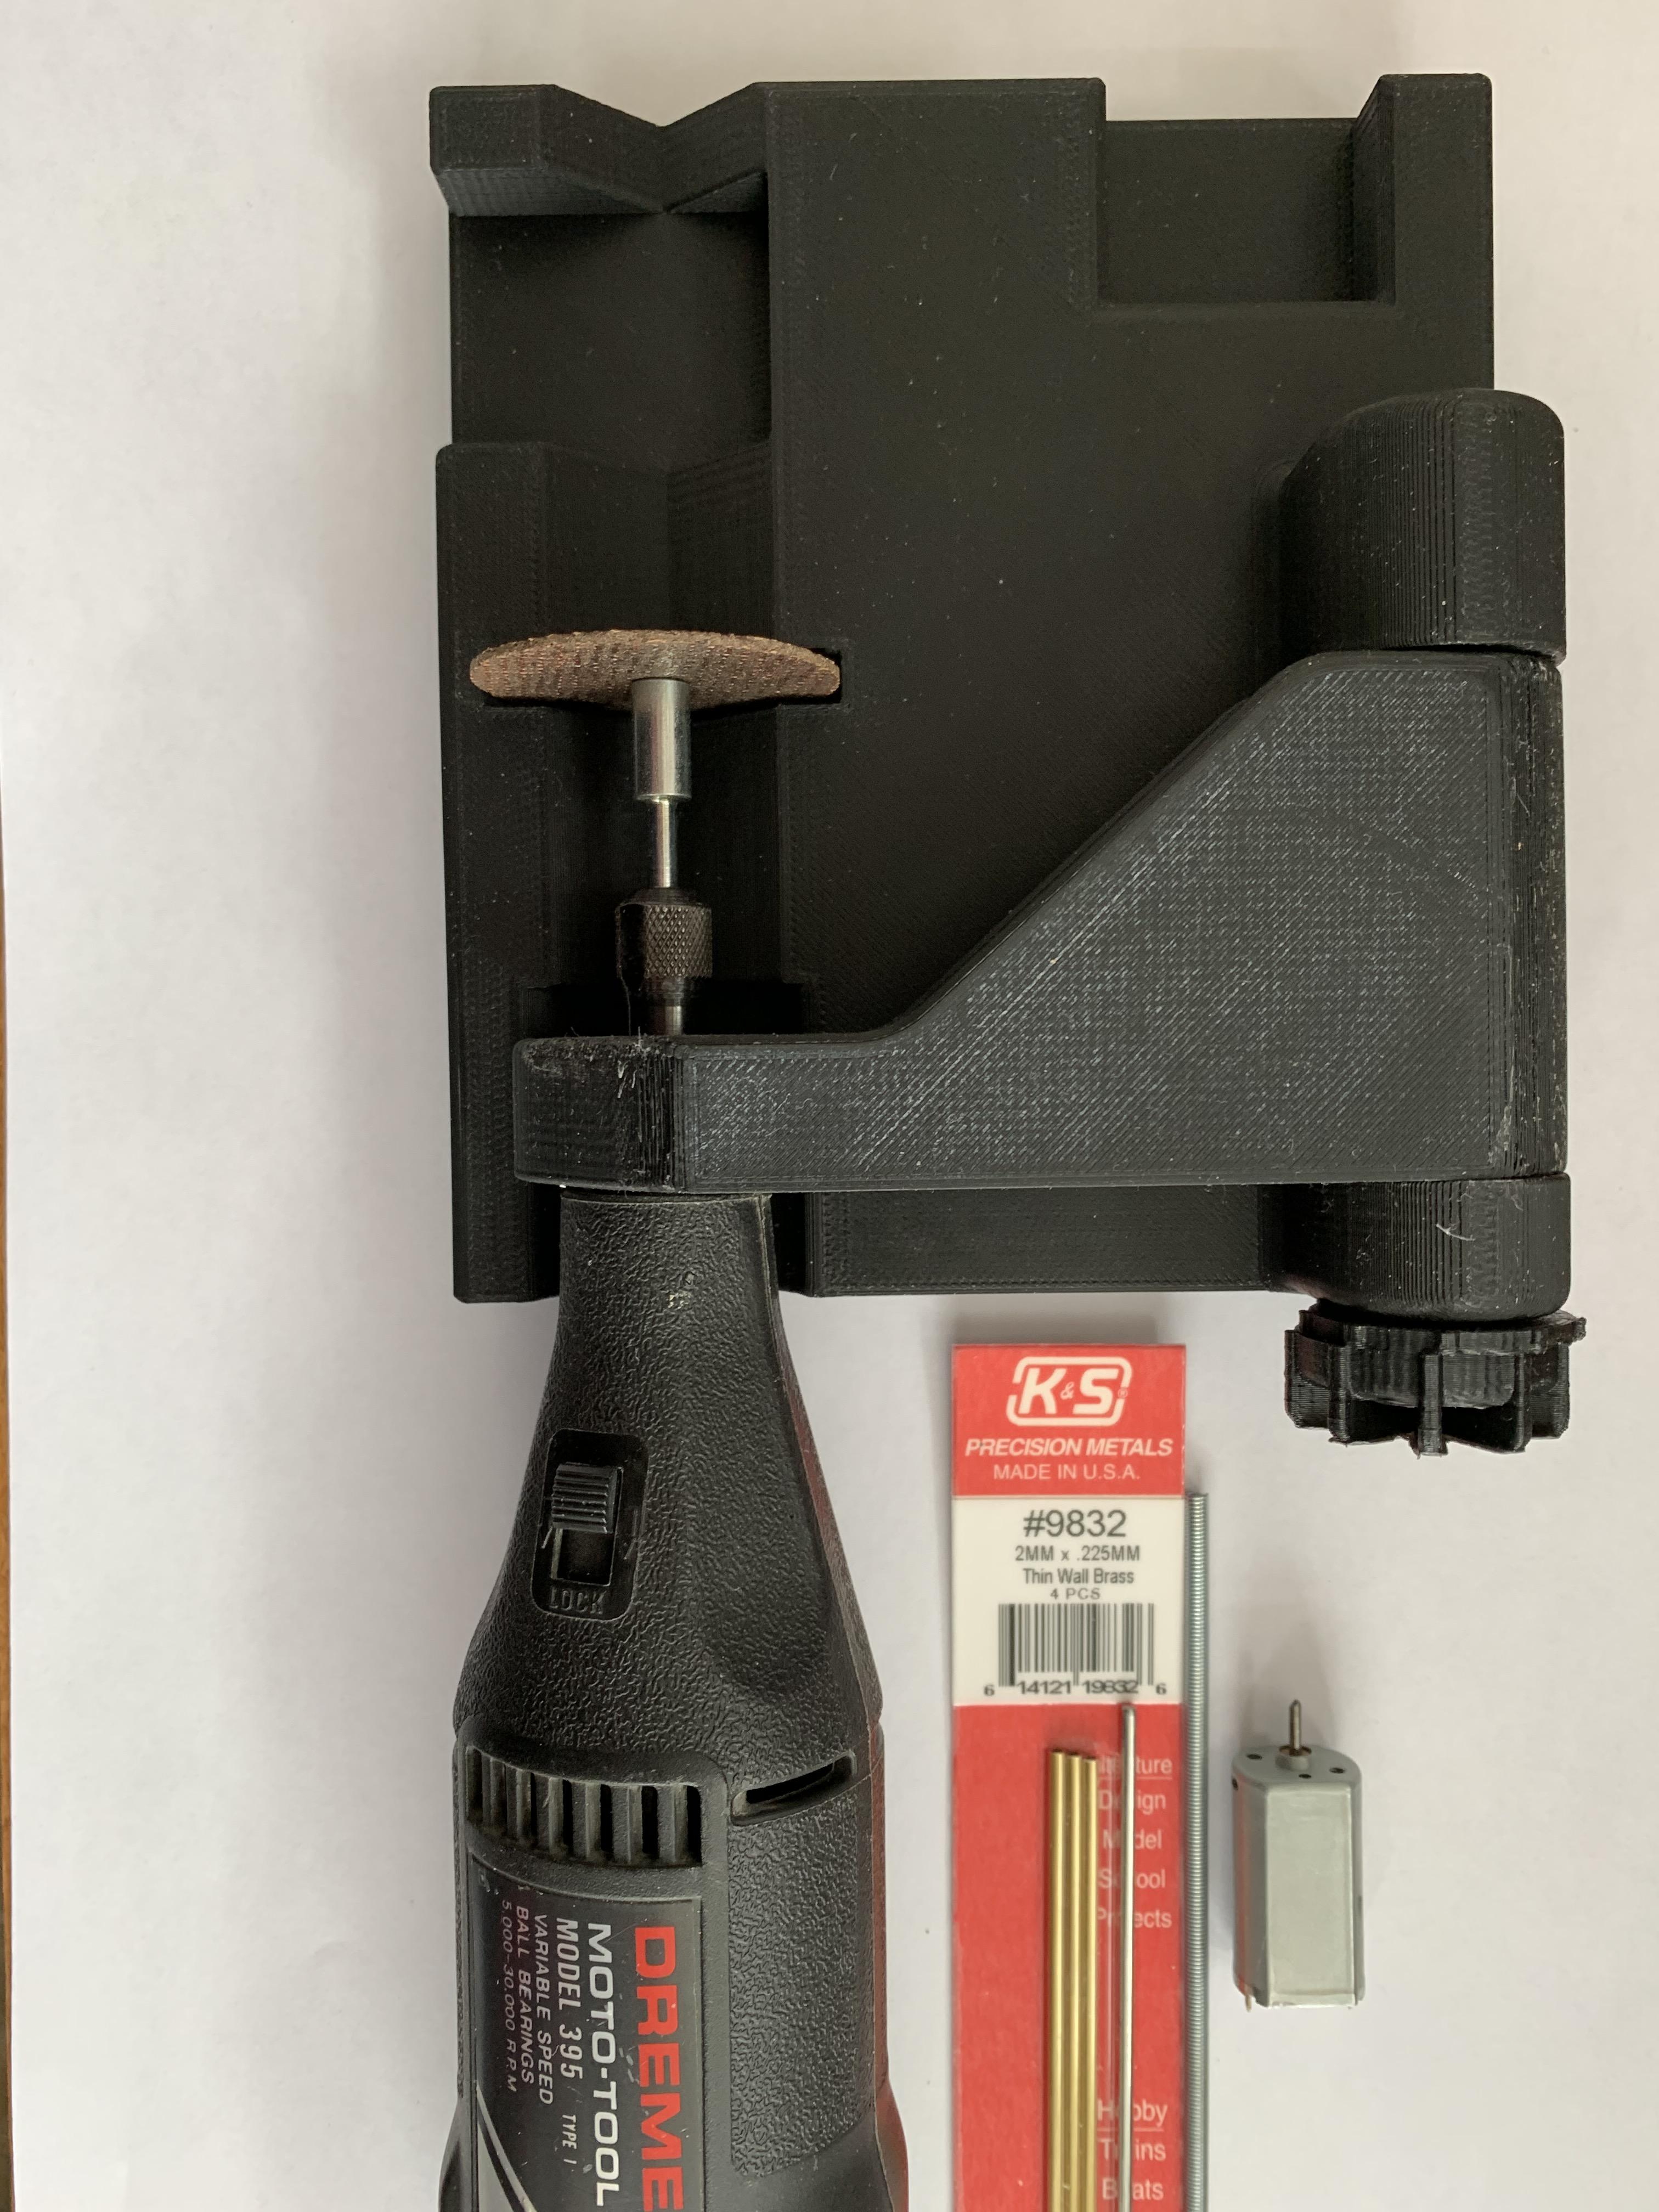
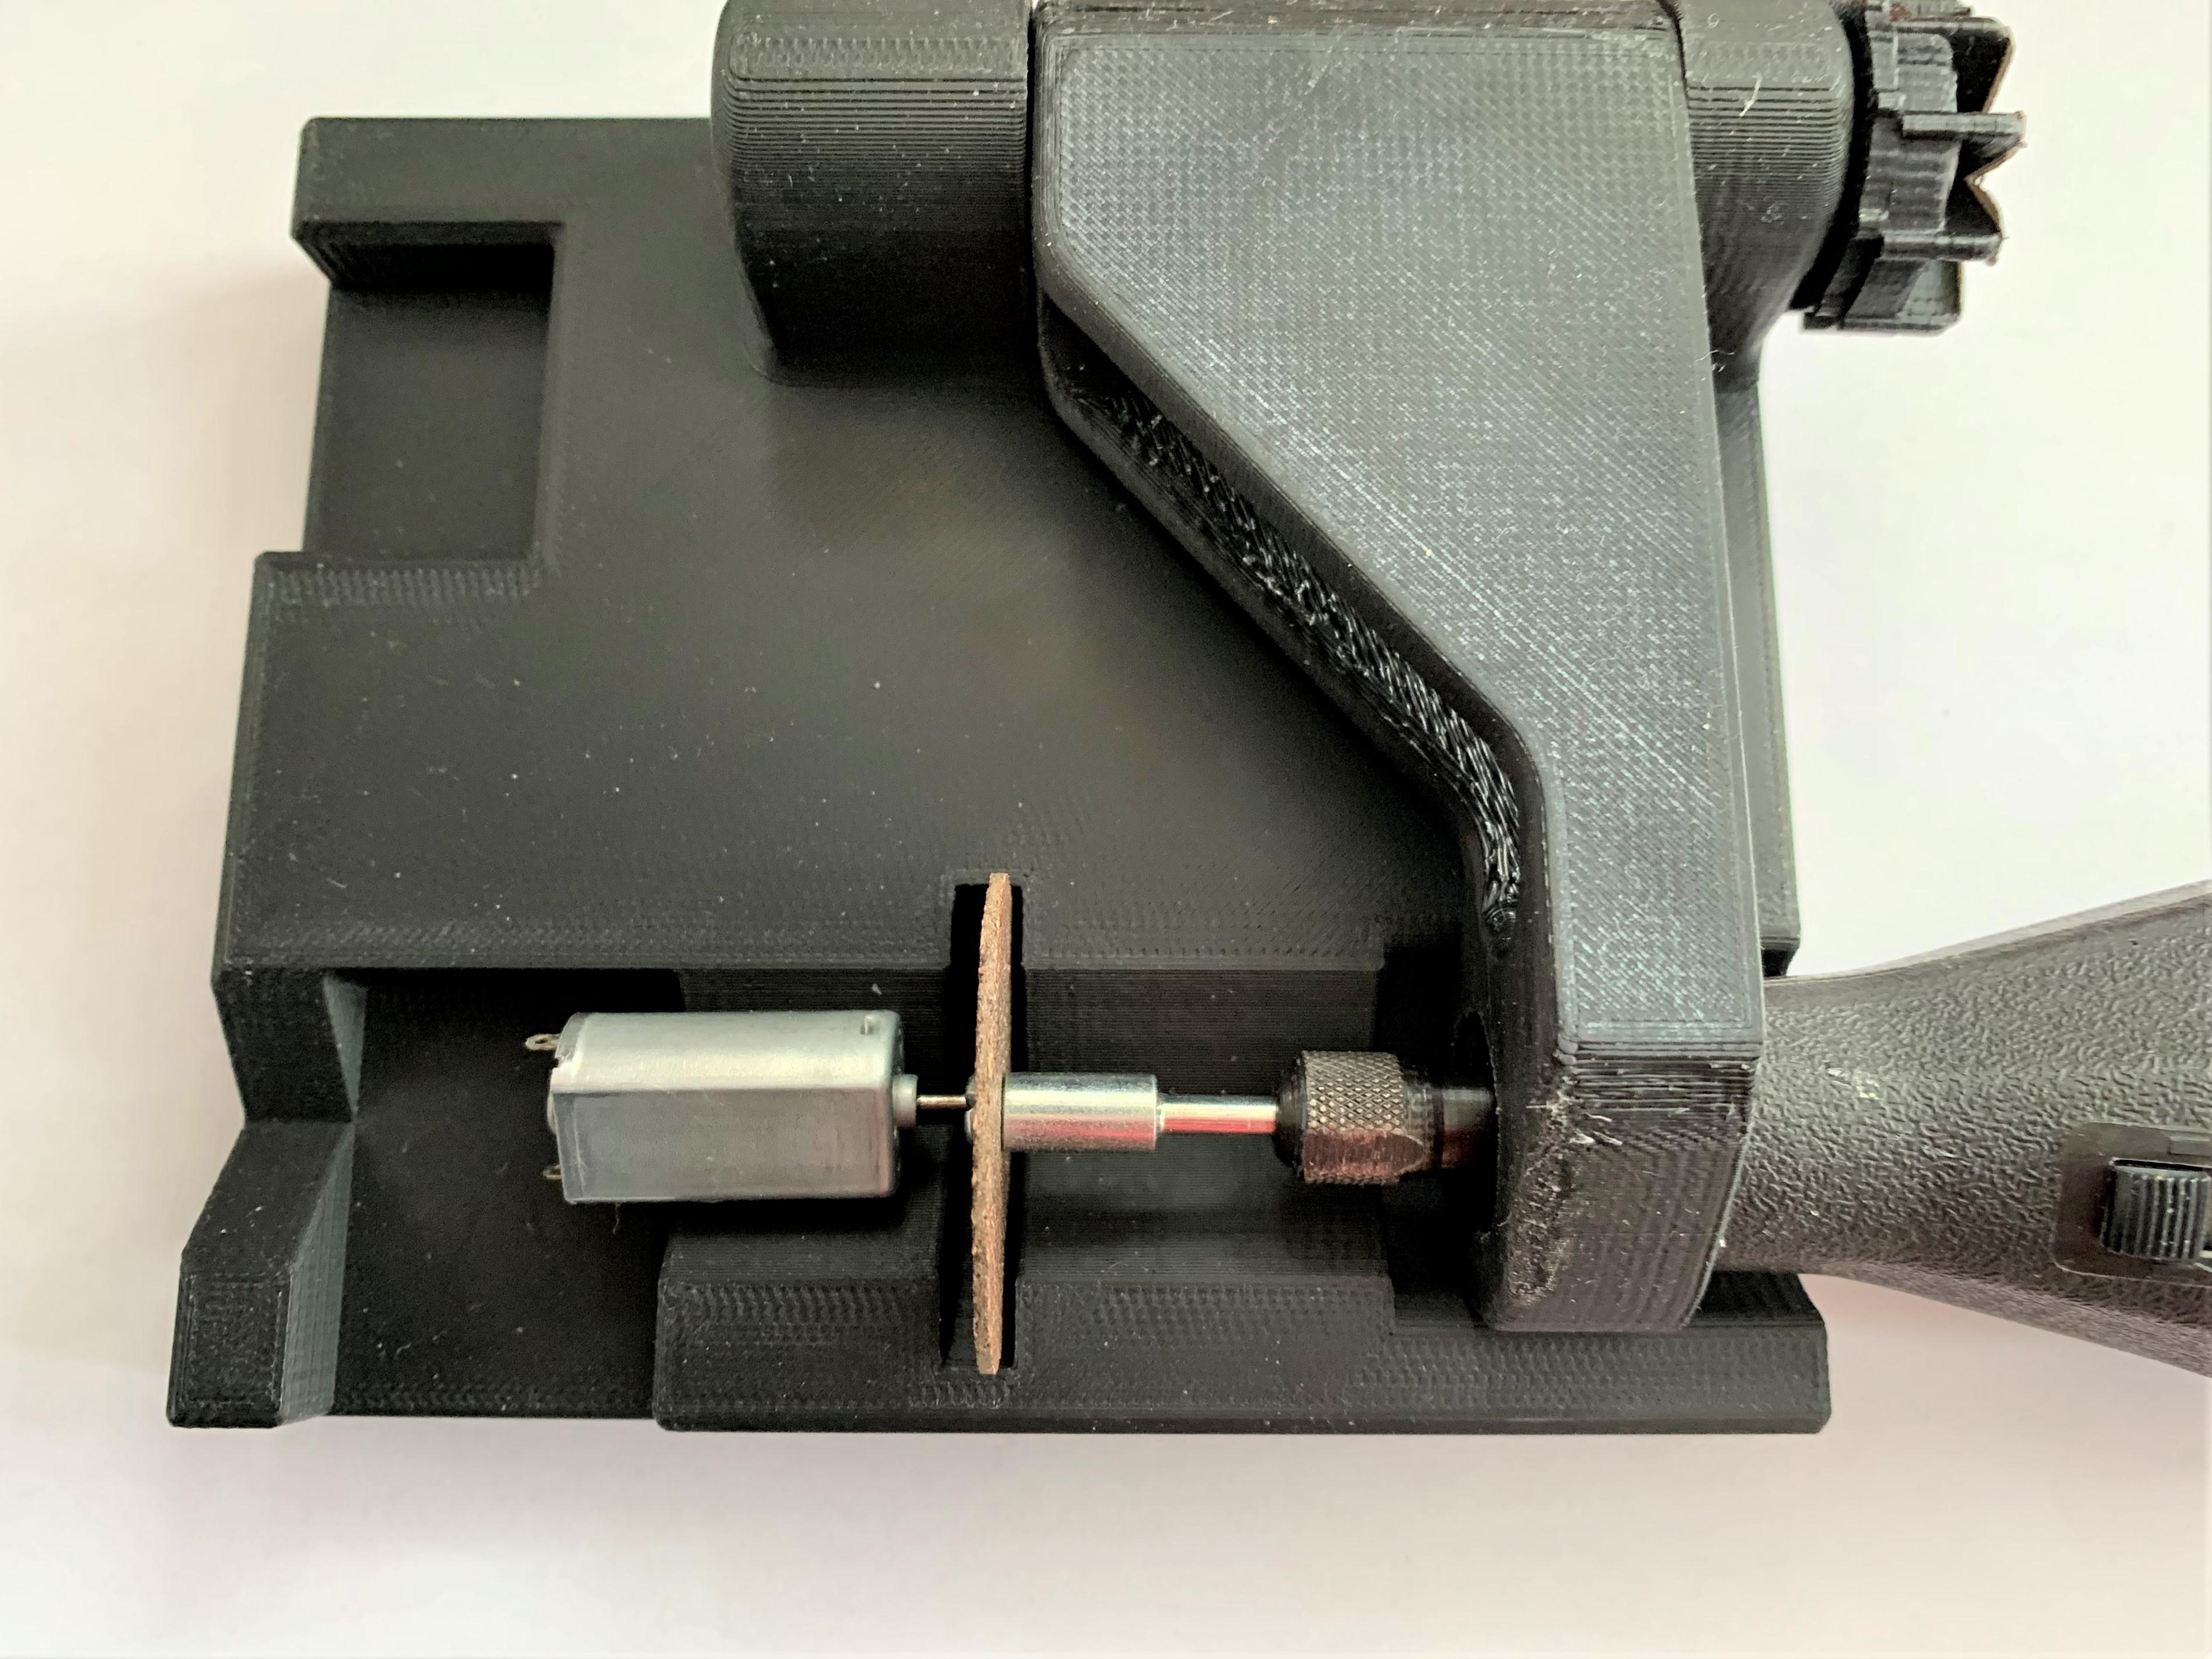
I found a free file on Thingiverse for printing a Dremel chop saw attachment and with only minor modifications I had a way of making precise cuts for the motor shaft, the tubing adapter, the spring connector and the 2mm gear shaft.
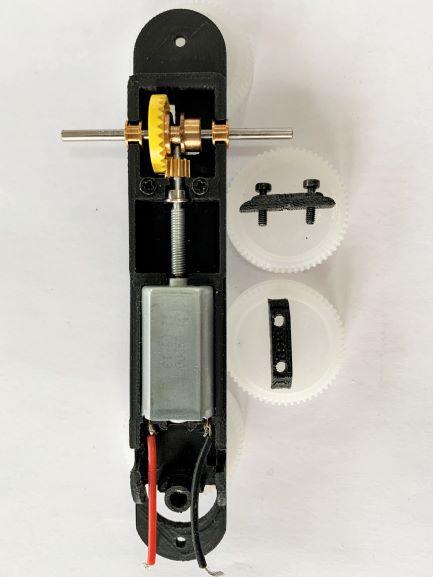
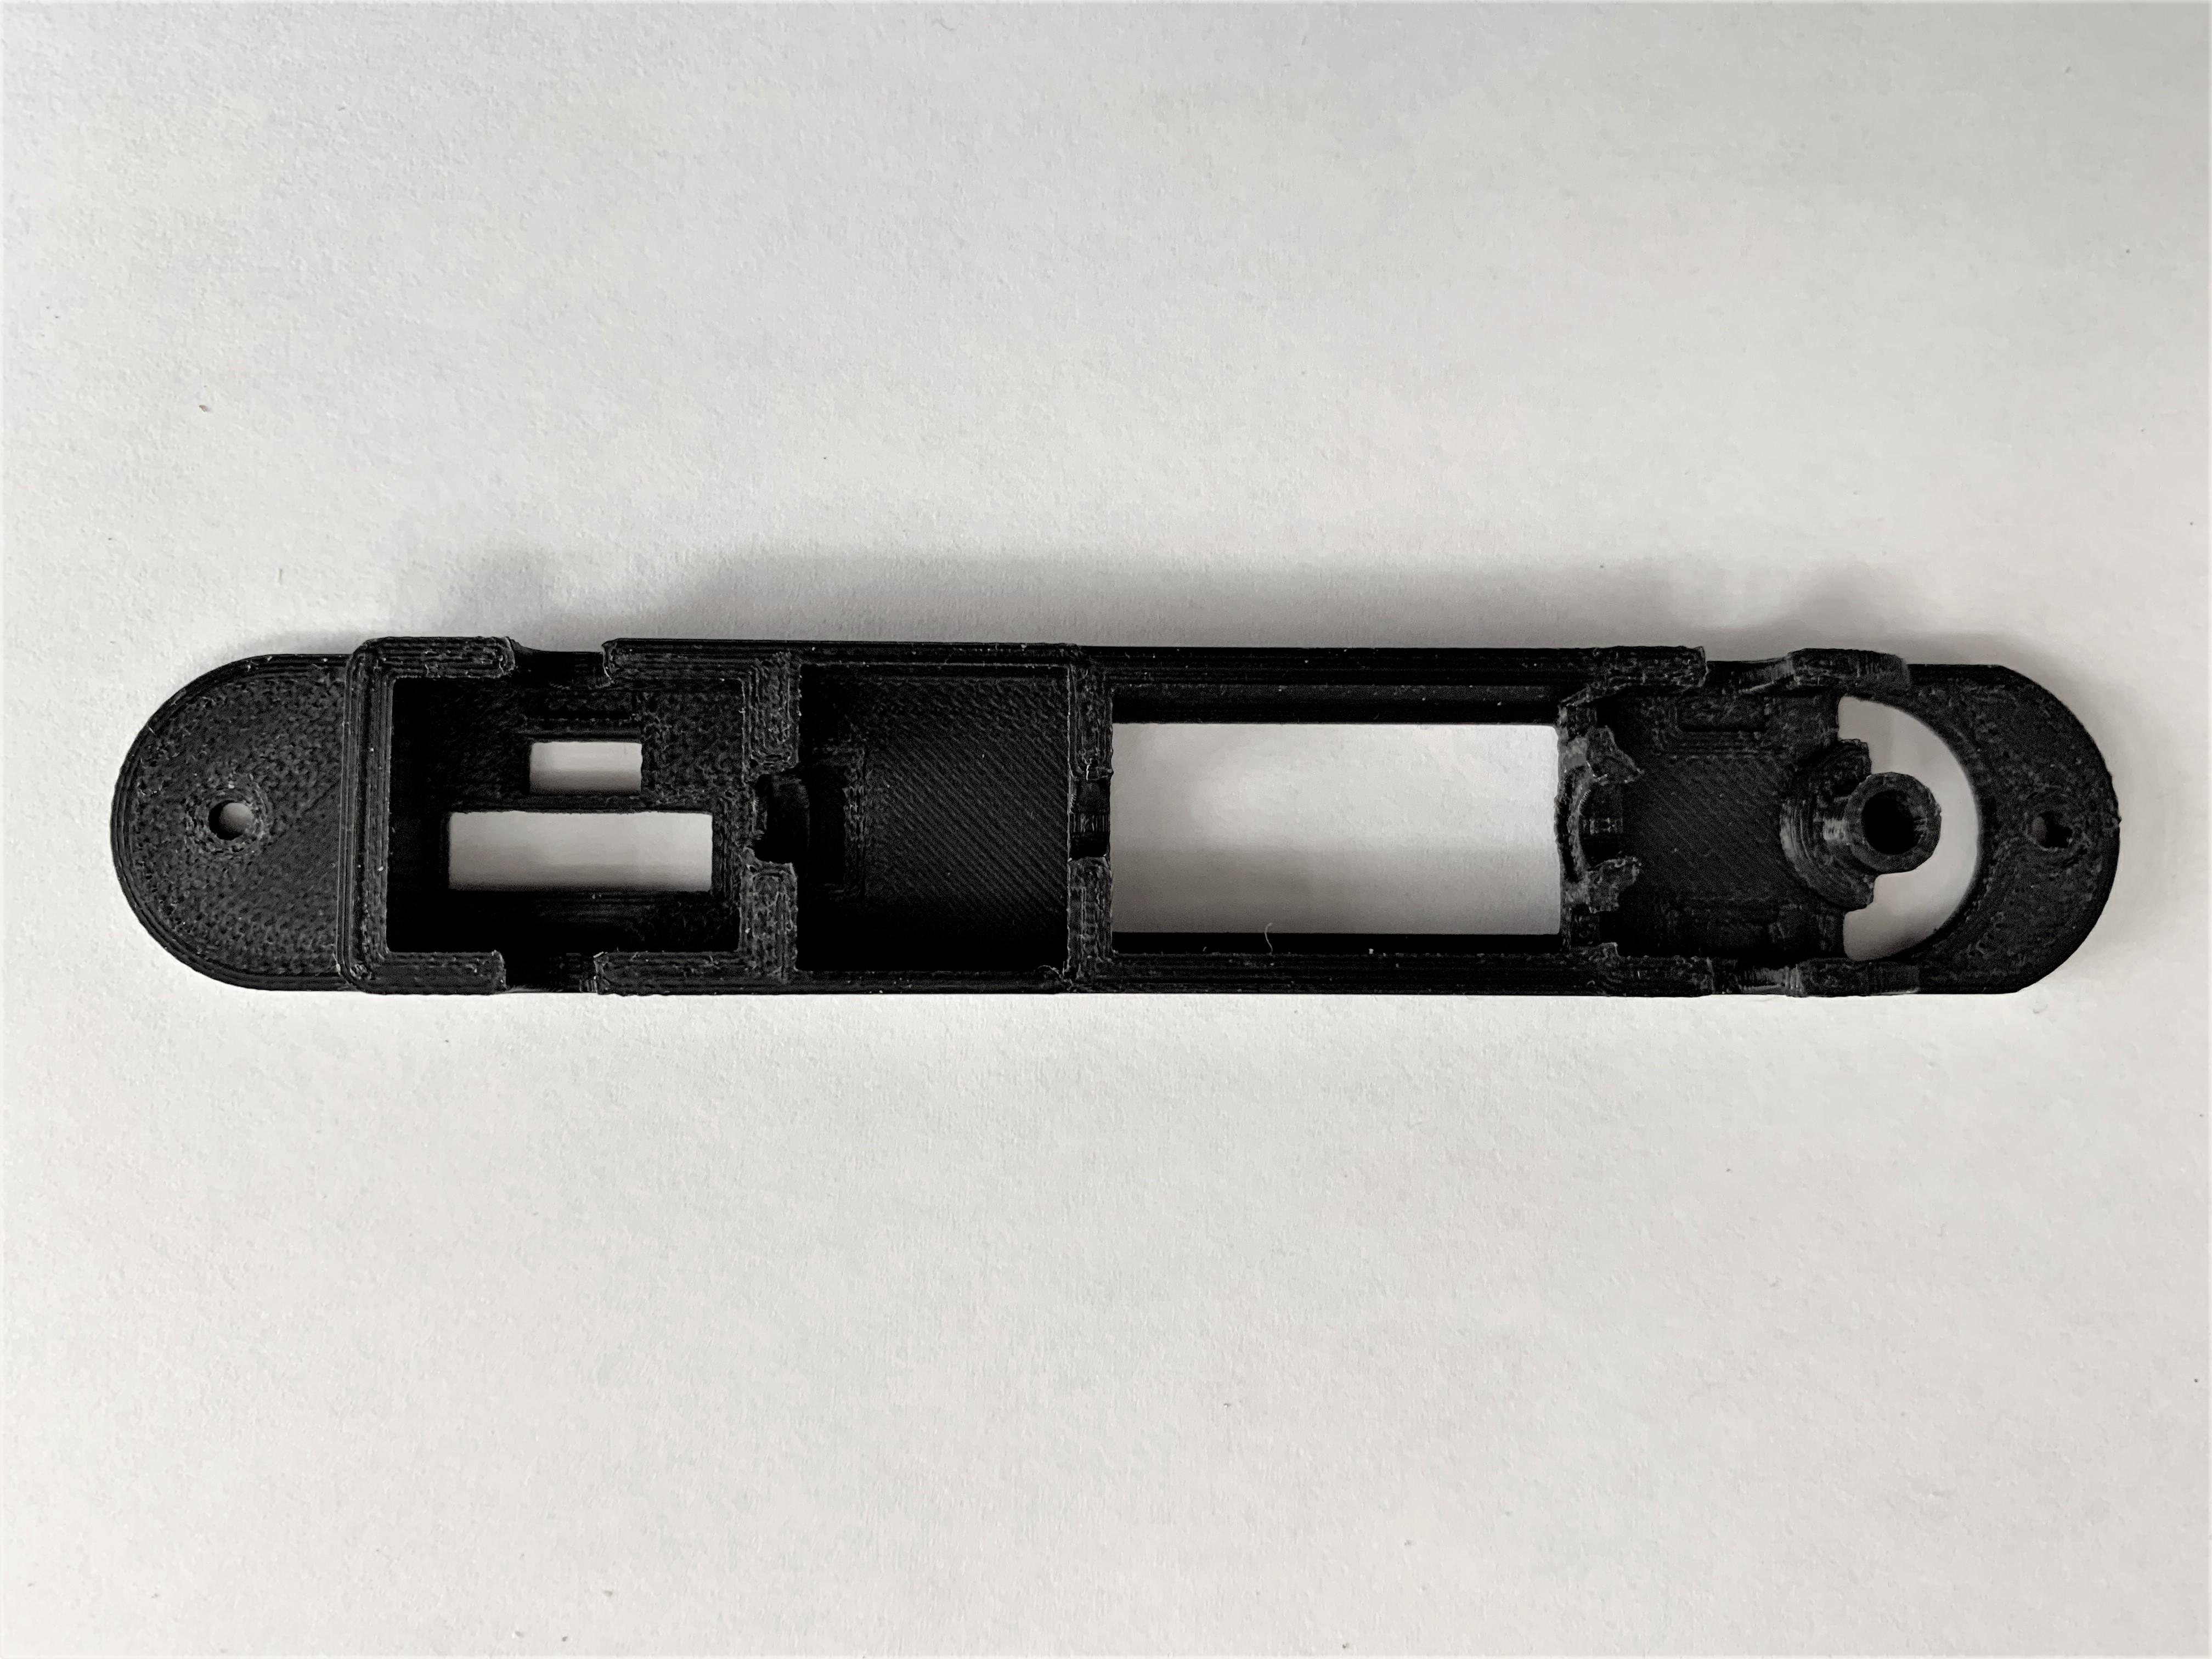
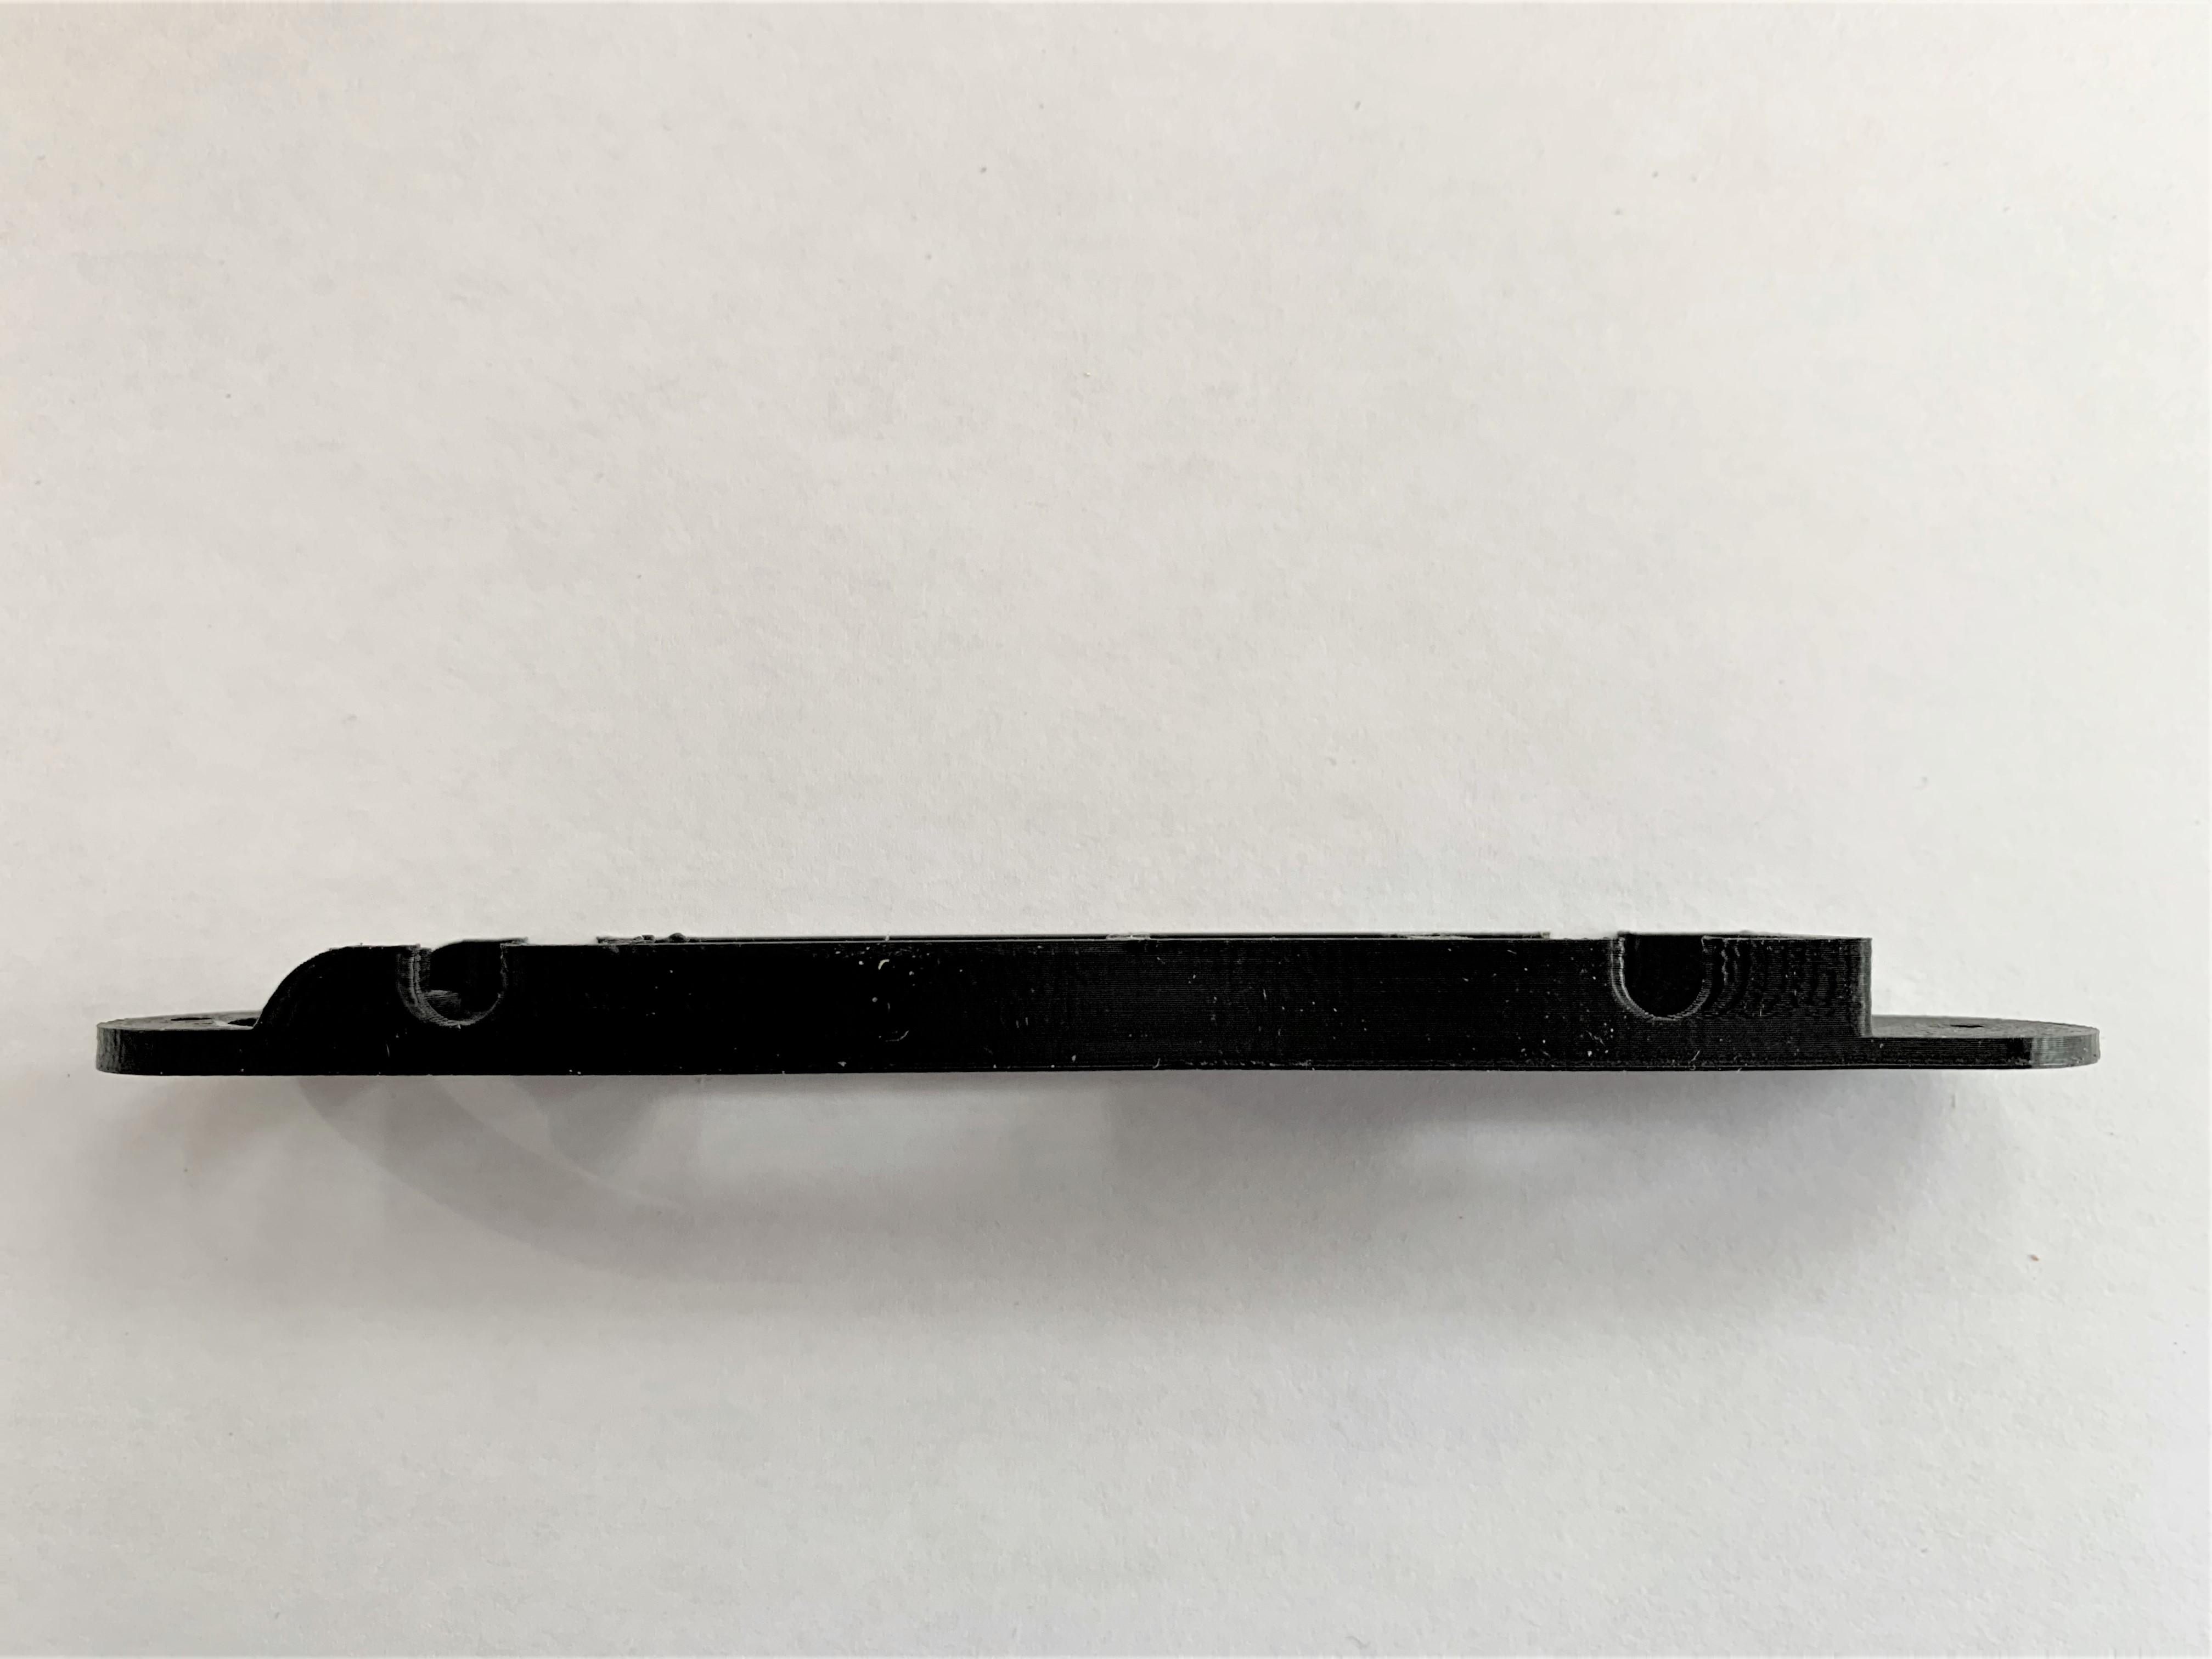
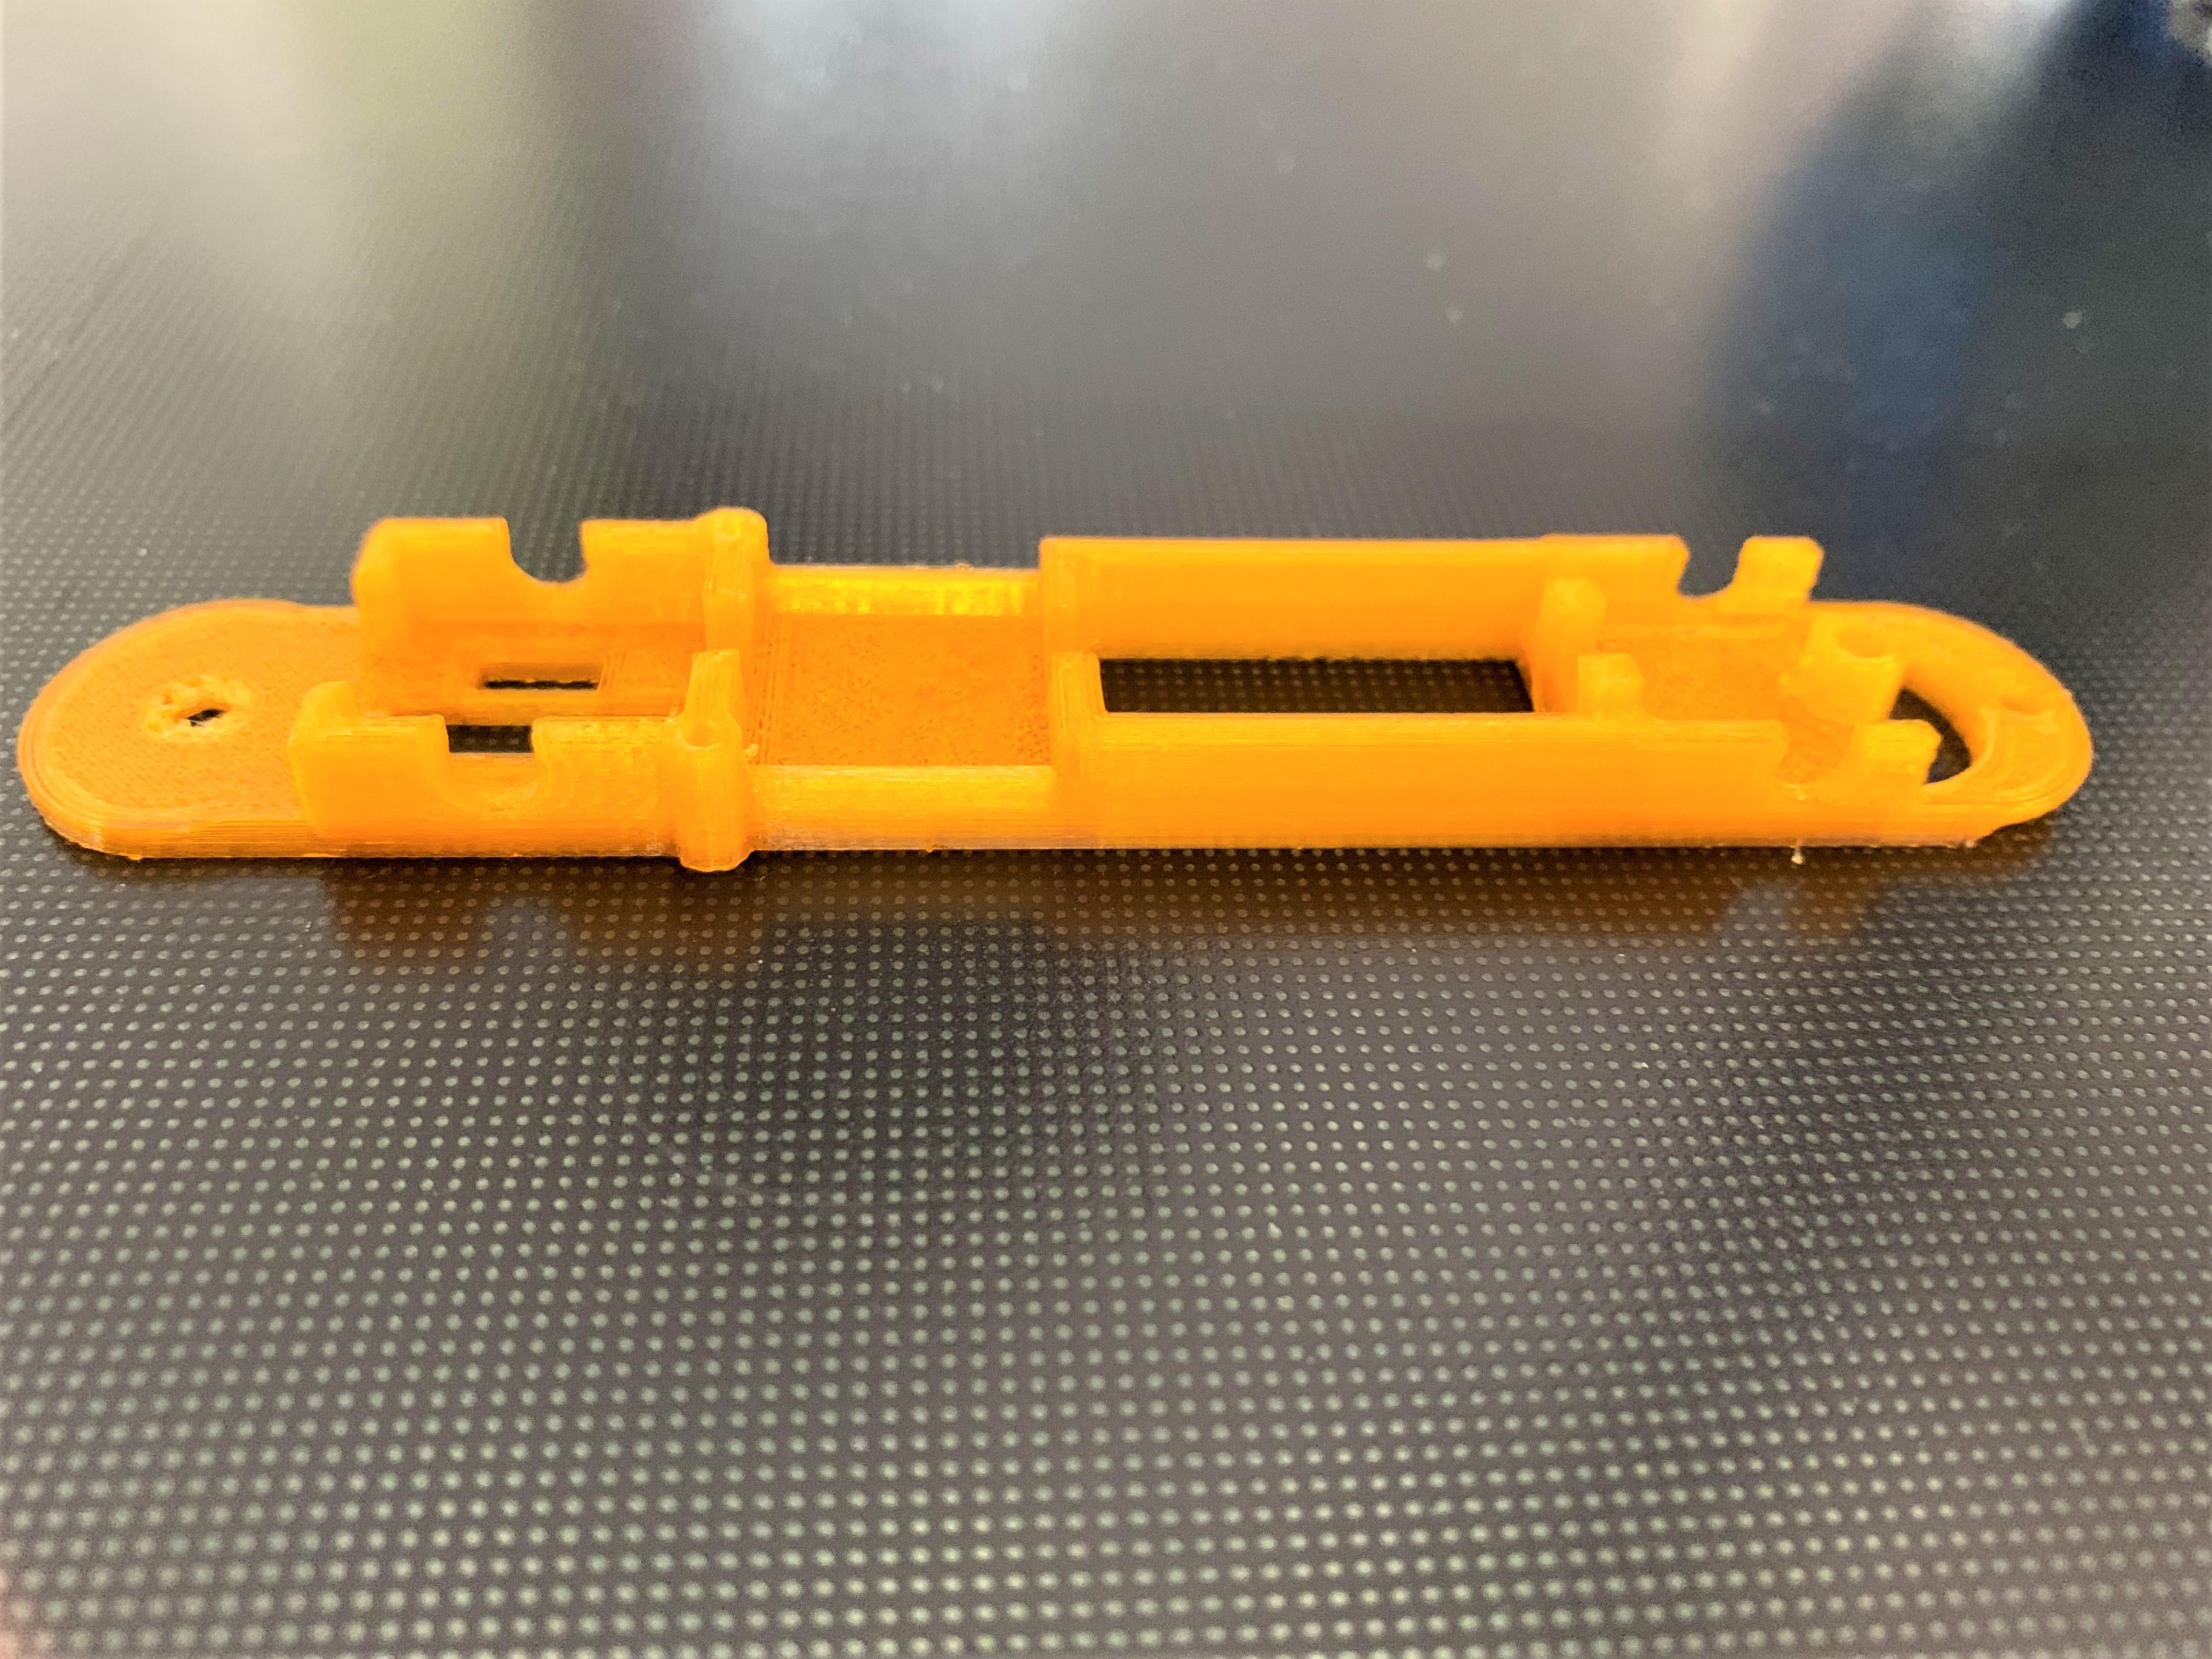
I went through several iterations of the chassis design to make sure all the components would fit and align properly and that the chassis would be strong enough to take the abuse that a roll over expert like myself could inflict. Here is the final result in black and another earlier version in orange, for greater visibility, sitting on the 3D printer bed.

There’s some more work to do fitting and testing the components and then trying the whole thing out on my plastic test track. I’ll try to do another update in a couple of weeks. In the meantime you all stay healthy and we will be racing again by the end of the year.
Cheers
Steve
Hi Drew
Thanks for the compliment. I am still developing this chassis and hope to do basic debugging on my Plastic track. The chassis as it stands is fairly stiff but the space just over my initials is designed to hold some weight, either a piece of brass or some lead in order to move the center of gravity further towards the rear axle. with brass glued in it should be extremely stiff, my initials are just a little bit of vanity and are not likely to stay as is. The needs for flexibility in certain planes of a slot car chassis is very complex in such a small narrow chassis with a front motor but I am experimenting with some webbing reinforcements in order to keep the flex only where it’s wanted. 3D printing allows me to vary the thickness of the chassis strategically and Fusion 360 even has tools to show where the stresses are, although these are still beyond me. I am trying to modify my design so that I can do a precise wheelbase for those that already have bodies that they would like to fit. The material I am using is PLA which is very stiff but somewhat brittle and I’m going to experiment with an enhanced PLA, PETG and ABS to see which is the best combination of printability and durability. If I can get my design refined enough to be useful to others I’d certainly consider producing at least a small run. I think the Indy Roadster class is a natural for this type of chassis as between this chassis and Art’s body anyone could build a car to qualify for this class.
Cheers
Steve
I’m not sure about the details of doing an outdoor race but Luis has very generously mentioned that he has a place where a bathroom would be available and that would go a long way to convincing me to participate . I look forward to when we can race again but the pandemic has been difficult for my family and I think continued caution is warranted. My aunt got very ill with Covid and developed kidney failure and my cousin Nick died. Tele-funerals are a sad and surreal thing. Scarborough has been particularly hard hit and I think the vaccines are our best hope right now, people don’t seem to have either the personal discipline or the sense of shared fate that would help us out of this before they arrive in bulk.
I’ve been working a little on the Indy roadster class and inspired by Colin John over at Group 25’s facebook page I’ve even slowly been learning fusion 360 in order to be able to make custom chassis for my roadsters. My current 3D printer is a malevolent toy that is not large enough to print an entire chassis but I’ve been experimenting with ff050 motor pods and shaft supports and I thought I’d share this picture of my current iteration.

the pod in the foreground should meet the criteria for motor placement, the one behind is a few millimeters too short. They both fit the motor very securely without the need of screws or glue. The parts have been designed to work with standard size Scalextric or Carrera bushings or their bronze equivalents. I’ve been using PLA to print and as it is not as strong as the ABS or Nylon that a manufacturer might use so I’ve had to make some compromises in design to make up for its relative fragility. It is stiff and very light. The whole chassis without fittings will weigh just under 6 grams! I hope you are all well and if we can’t race ’em it least we can build ’em!
Cheers
Steve
Looks great Drew, thanks for the pictures, I like the use of the cut down furnace filter. Is that a Ranchero on the turntable ready to be painted tomorrow?
Cheers
Steve
Hi Drew
Sorry I missed your question until I saw Ken’s recent post. I used a wood working dust port That I found on Amazon : Big Horn 11428 4-Inch Dust Port with 4 Mounting Holes .
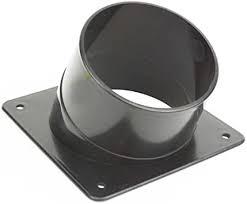
This one is offset to one side as it fit the space that I would usually use the best but there are straight ones available as well. I then used a large hose clamp to attach the ducting to the dust port. I used the box in a box design as it makes it easier to pack up and move around. It is a little easier to seal but it’s probably much of a muchness especially if you don’t move your booth often. I think your enhancements sound great. More light is always a good thing and the turntable is something that I need to get for mine. Please post your finished booth. I find it fascinating the different ways our club members can solve the same problem.
Cheers
Steve
Thanks Felix
There is a wealth of experience amongst our friends and I appreciate your sharing yours. Photos are especially helpful. I think that I can use your approach as I’ve had the same issues with off centre holes and wandering. I’ve been trying to work on a low power ff050 front motor chassis in between more pressing projects and precision is important because of all the other potential power losses with such a design.
Cheers
Steve
Thanks DB
I especially appreciate the included photo. I don’t have Ken’s skill either but I have the drill press and with a couple of drinks to steady my nerves I think it’s worth a try.
Cheers
Steve
Thanks Gary
It’s great to have more resources . Does anyone have any experience or tips on building scratch built brackets? I’m trying to figure out how to build modular chassis with scratch built parts so that a limited set of modules could be used for both rear and front motored cars( such as Indy Roadsters) of different wheelbases.
Cheers
Steve
Looks great Gary, I love that the motor is fully exposed. It gives it that real “Hot Rod” feel. Would you please give us some details on your rear axle bracket, did you fabricate it yourself ?
Cheers
Steve
Drew the fan looks fine, good specs, good price, good reviews. Using twin or triple fans does need either a custom box or vent but it’s all just bench racing until you actually have to do it and I haven’t done it yet. If I get around to the upgrade in the next few months I’ll post photos. My original booth was designed for easy disassembly and storage, that’s why I used the box in a box idea. The rear exhaust assembly is attached with a hose clamp which can be loosened and the whole thing stored inside the tote with it’s lid on. None of us ever have enough room for all our toys!
Cheers
Steve
Hi Drew
I think that this sort of simple spray booth is a great return on investment and an excellent way to keep painting through the winter. Sourcing parts can be really confusing but Amazon is still a great source of to your door parts. The fan I used is: https://www.amazon.ca/gp/product/B009OWRMZ6. When I bought this fan it was only $18.99 plus tax and it’s a great little fan, but now it’s over 50 bucks and no longer meets my budget hobby criteria. There are tons of suitable alternatives though. The things to remember while searching are to get one that runs off of household current or comes with a transformer or speed control and that it has a brushless motor (most computer and equipment fans on Amazon do) so that there is little chance of ignition when using solvent based paints. I would also recommend that it move at least 110 cfm of air, which is equivalent to your average bathroom fan. You can buy single, double or even triple fan arrays allowing for some very substantial air flow. The more the airflow the less chance of vapors getting into your living space but the greater chance that dust may get sucked into the booth unless the room you work in is immaculate. I am thinking about a an upgrade to my fan: GDSTIME Big Airflow Dual 2 * 120mm Fans DC 12V Powered Fan with AC 110V – 240V Speed Control, Cabinet Chassis Cooling Fan, Server Workstation Cooling Fan which would allow me a little more power and flexibility and is still only just a shade over 30 bucks.
I have some observations on the effectiveness of the odor removal. I would say that using an airbrush that it is close to 100% effective. When using spray cans it depends on the type of paint and the can. Hobby acrylics are probably undetectable after 5 to 10minutes, hobby lacquers maybe another 5 minutes more. I think that it would certainly pass the wife test if your workshop is in a different room. Automotive spray cans and the large rustoleum type spray bombs heave a lot more paint into the air and would require both more airflow and and a little more tolerance.
I hope that this has been helpful.
Cheers
Steve
I’m sorry to hear that John has passed away. He was always a gentleman and very welcoming to newcomers to the sport. Condolences to his family and all of you who knew him well.
Steve
Art, I’ve always enjoyed perusing the classifieds and have bought items from them on several occasions. Of course, it was much easier before the lockdown, when I could arrange to pick up an item during a regularly scheduled race. It was also easier to make arrangements with people who live in the east end of the city as travel times are so much shorter. Ken and I live only 8 minutes apart. Health concerns have kept me from participating most of this year but when things start to get back to normal by next summer I’d appreciate the classifieds still being around, not only can it help budget minded hobbyists like myself keep running but they often reveal hidden treasures that I didn’t even know existed. Where does Ken find all these great 1/32 scale kits? DB, knowing that you are in Ajax, only 25 minutes or so away from me, I’d certainly consider any listings of yours in the classifieds (post pandemic). The classifieds lend the site this casual, homey feel that makes what can seem a very technical hobby more inviting and accessible, and I for one would like to see that continue. I wish all of my friends in Scratch 32 and everyone interested in slot cars everywhere a Very Happy New Year!
Cheers
Steve
November 25, 2020 at 4:27 pm in reply to: What kits are you buying, building, working on during isolation? #16841That’s a very cool find Ken.
Steve
In “Building a Front Motor Indy Roadster” when Art asked for further feedback on the class rules I had opined that “Wheels and tires can be tricky but as some of the earlier roadsters had fairly narrow tires that wouldn’t look out of place in the Coppa D’oro and some of the later roadsters had tires wider than the F1 cars of the same era I would stick to the reasonably scale appearance guideline. With the low power front motor configuration wider tires are not likely to provide any benefit just a little more flexibility in choosing and building our cars.” I stand by my original opinion. I would like this class to encourage diversity in models and building and limiting the wheel sizes would do the opposite.
Cheers
Steve
I’m happy to hear you’re building a roadster too. I’ve got a second set of springs on order that I hope to share with the club .The last set took several months to arrive and this one seems to have disappeared from tracking, fingers crossed they will show up in a month or so.
Cheers
Steve
Thanks for the details Jim. That’s a great looking little kit.
Cheers
Steve
Great looking model Jim.
Those Ostorero roadster bodies are the nicest I’ve ever seen and they sure build up into a fine looking slot car. I’m looking forward to seeing the progress on your Simoniz Special as well. Would you please post a few more pictures of your chassis to help those of us who haven’t finished ours yet?
Cheers
Steve
April 21, 2020 at 1:15 pm in reply to: Slosh Cast Parnelli Jones Watson Willard Battery Special #14585It looks great. I think this class more than any other has challenged our ingenuity and building skills. The decals really make the car pop, can I ask where you got them and are the blue and red areas decals as well or did you paint them?
Cheers
Steve
That looks great Ken. It’s just the kind of detailed information that will let us all engineer our Indy Roadsters.
Cheers
Steve
Hi Art
I can no longer see this weekends Classic era challenge and club races listed on the calendar and can’t find it using the search function. Is this a problem due to the update , or has the race been cancelled?
racer68
If the people want front motored, lets give them front motored ! I would like to ask, as a very slow builder, that we formalize the basics of the formula as soon as possible so I can start on my cummins diesel. I’d really like to be ready for this race and unlike most of you , it takes me a couple of months to complete a car. As we have an idea of some of the other parameters, what motor should we use?
Cheers
Steve
Hi Art
I think racing front engine Indy cars from the 50’s and sixties would be great. I’ve always been a fan. I like the idea of running the slow motors, perhaps allowing both to allow building flexibility, but I think that having the chassis free as we do in The Coppo and Ringwood would be my preference to a front motor restriction. More people would be likely to build a car or adapt one of their current chassis to an Indy body. This should encourage more participation and a greater field. A generous tire size allowance would also be important as Johnny Parsons 1950 Indy winner had tires much like our pre-war racers but the final roadster, Jim Hurtubise’s 56 Mallard from 1968 had really wide low profile tires that wouldn’t look out of place on a Can-Am car. If the chassis choice was open I’d definitely build The 1952 Cummins Diesel special ( I have one on my build list right now) and probably a Novi or a Watson Roadster as well.
Cheers
Steve
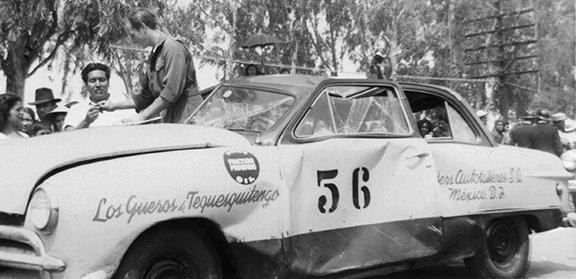
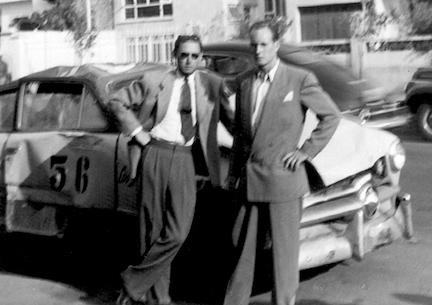
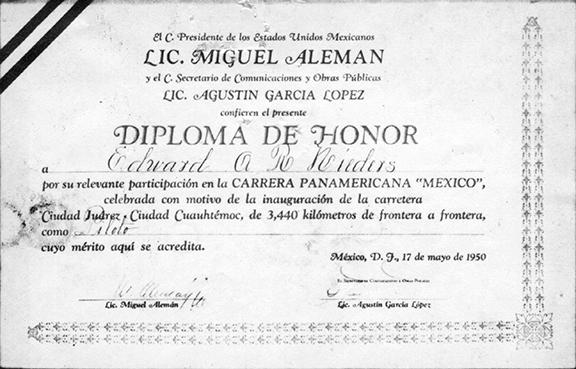
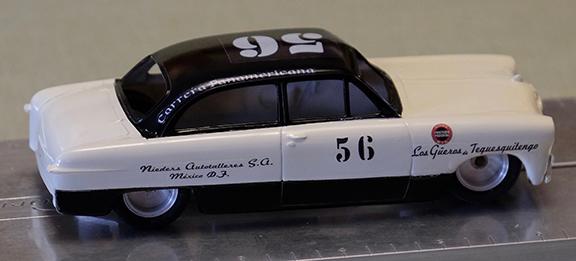
May 28, 2019 at 12:32 pm in reply to: Livery – Carrera Panamericana I – 1950 – #56 1949 Ford (Nieders MEX/Diener MEX) #11467Ken, thanks for the support. The two tone paint was achieved using Tamiya masking tape at the demarcation lines as it allows very little colour bleed. The paint was from Tamiya rattle cans. The colours are Black and Racing white over white primer. Based on the information that Ralph Neiders kindly shared with us , this was the closest available match. The original light tone was Ford Miami Cream and the entire car was repainted that colour after the race before being sold as a “low mileage” used car.
The lettering required careful matching of available fonts as well as some bit map modifications of certain letters as the original used hand painted lettering. This was all done in Photoshop, which includes a text to path function that allowed us to do the elegant sweep of the Carerra Panamericana lettering over the windows. The decals themselves where printed from an Epson Workforce inkjet printer onto clear and white generic waterslide decal paper from Amazon. The whole thing was sealed with three coats of Krylon Acrylic Crystal Clear and allowed to dry for 18 hours . The decals were then cut out soaked in water for 20 seconds and applied to the model with Micro Sol setting solution. They were fairly resistant to snuggling down especially the ones printed on the white paper.
Cheers
Steve
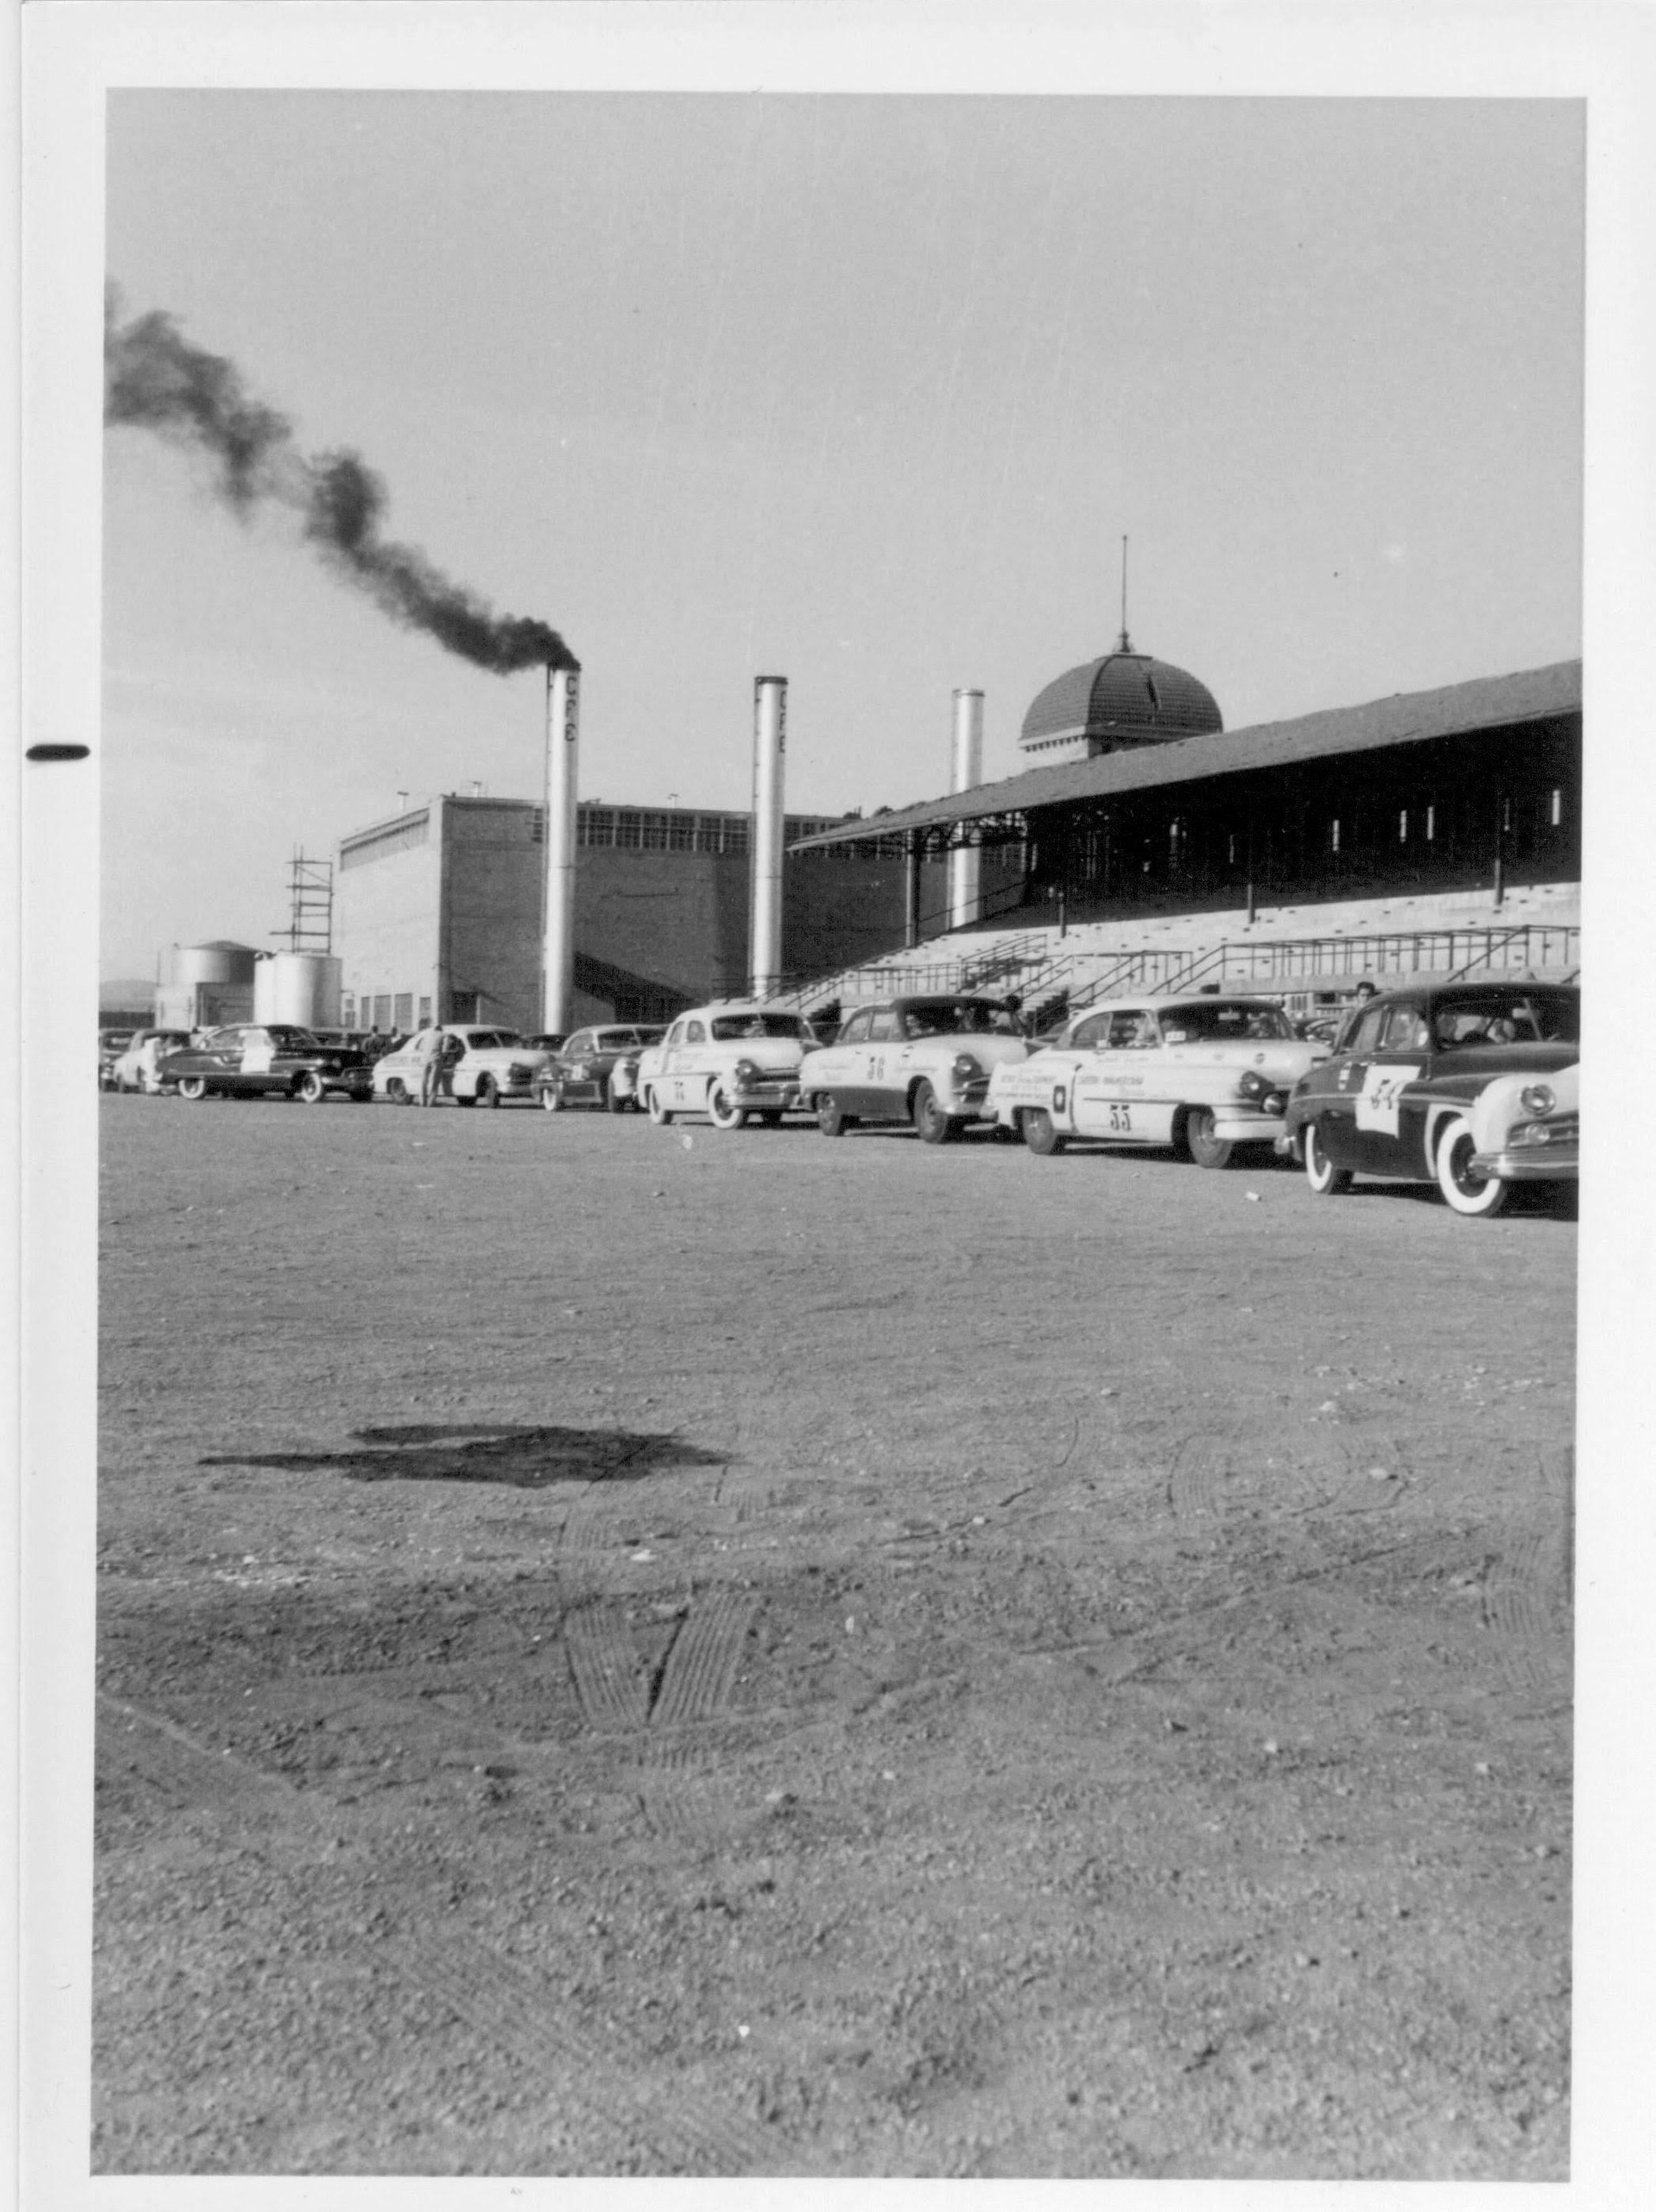
May 27, 2019 at 8:27 am in reply to: Livery – Carrera Panamericana I – 1950 – #56 1949 Ford (Nieders MEX/Diener MEX) #11458Here’s a few more pictures of the no.56 car including my work in progress.
Cheers
Steve
May 23, 2019 at 1:33 pm in reply to: Livery – Carrera Panamericana I – 1950 – #56 1949 Ford (Nieders MEX/Diener MEX) #11437Some more info:
I have the info on the colours on the No. 56 car. The body was most likelyFord Miami cream, Ralph said all his dad’s cars where ivory or cream and black the closest match I could I could find was Testor’s Racing White , which is sort of an ivory colour but might be just slightly too light. The roof and the rocker panels were black. The door numbers were black and the h.uge roof number was white. Ralph told us that the car rolled six times as Max Diener was driving and his father was in the passenger seat. After the race the car was repaired and sold as a low mileage used car.
More to come.
Cheers
Steve
May 18, 2019 at 8:26 am in reply to: Livery – Carrera Panamericana I – 1950 – #56 1949 Ford (Nieders MEX/Diener MEX) #11389Thanks very much Art for posting this info. I’m in the middle of building my car now with Ken helping me with one of his patented chassis. I’m just finishing off my research and getting ready to print out some decals so this couldn’t have come at a better time. My wife, a great researcher, got us in touch with Ralph Neiders who was able to give us a little more info and some great stories about his Dad. Once I sort through the information I will post it.
Cheers
Steve
February 10, 2019 at 1:16 pm in reply to: Lotus 30 – DArt Body & Scratch Sidewinder Low Power Motor Chassis #10575Thank you Art for posting this step by step build. The level of detail in your photos answers a lot of my questions. The explanation of the motor mount, bearings and the positioning on your jig will help me make a better chassis than I’ve been able to do before.
Cheers
Steve
February 7, 2019 at 12:25 pm in reply to: Lotus 30 – DArt Body & Scratch Sidewinder Low Power Motor Chassis #10559Art
The plans for your chassis sound interesting. I’ve played around with stubs and negative camber but my building skills are not yet up to the promise of the concept. I hope you’ll share the details of your chassis build to give us newbies a chance to see how it’s done. I think it’s great that you can scavenge and repurpose pieces for your builds. You wouldn’t remember the electronic device that you took the pinion out of? I’m sorting through some electronic trash, dead DVD players, old hard drives and the like trying to figure if it’s worth my time to disassemble them to scavenge parts and materials for slot car racing or scale modelling.
Cheers
Steve
Thanks Art, for posting these photos. I was one of those clamouring for more details. It really helps novice builders to see the details of a successful build.
Cheers
Steve
Art
A bijou masterpiece. The amount of detail you have been able to incorporate into a running slot car is stunning. I really appreciate the photographic documentation for this build. Would you please give us a little more detail on how you developed your snap in mounting system as it looks like an elegant solution for narrow cars on wire chassis and some more detail (maybe even a mini tutorial?) on how you set up the front end with those those stub axles as it looks like the perfect solution for a period car. Your work has inspired me to attempt the 1938 Maserati 8CTF that won the Indy 500 in 1939 and 1940 and I hope to integrate some of your techniques into it so that I can join you guys at a future Coppa D’oro.
Cheers
Steve
Ken
Great Slot car box. I love the detail in the article and the photos. From sandwich bag to breadbox is a great story arc. Keep up the detailed postings. It helps to inspire the rest of us newbies!
Cheers
racer68
Looks great Ken. I was wondering what size and type of drill you used for the bearing holes and if you could tell us a little about the bearings you used. They seem such a perfect fit. I love the look of the whitewalls with the dark paint.I really need to get some of those!
Cheers
Steve
-
AuthorReplies